CyberArk Integration
Nopesight Scanner integrates with CyberArk Privileged Access Management (PAM) to securely retrieve scan credentials on demand from CyberArk's vault, instead of storing passwords locally on the scanner machine. This enables centralized credential rotation, full audit trails, and enterprise PAM compliance.
Why use CyberArk integration?
- Eliminate local password storage — With CCP mode, no target-system passwords are stored on the scanner machine at all
- Automatic credential rotation — When CyberArk rotates a password, the scanner automatically retrieves the new one on the next scan
- Full audit trail — Every credential retrieval is logged in CyberArk with reason, timestamp, and source
- Enterprise compliance — Meets PAM requirements for SOX, HIPAA, PCI-DSS, and other frameworks
- Zero scanner changes — All existing scan protocols (WMI, SSH, SNMP, vCenter) work transparently with CyberArk credentials
How it works
Architecture overview
CyberArk integrates at the Credentials Manager level inside the scanner. All scanners (WMI, SSH, SNMP, vCenter) already request credentials through the Credentials Manager. By adding CyberArk as a credential source, all scanners benefit automatically with no code changes.
Credential resolution flow
All credential rules — both local and CyberArk — participate in a single priority-ordered pipeline:
- Load rules — All credential rules are loaded from the encrypted credential store
- Filter — Rules are filtered by scan protocol (WMI, SSH, etc.) and target IP address
- Sort by priority — Lower priority number = tried first. Tie-breaks use IP specificity (exact IP > CIDR range > wildcard)
- Resolve — Local rules return stored credentials directly. CyberArk rules query the vault in real time
- Fallback — If a CyberArk lookup fails, the scanner tries the next matching rule (typically a local fallback)
Assign CyberArk rules lower priority numbers (e.g., 10) and local rules higher numbers (e.g., 100) so CyberArk-managed passwords take precedence. This ensures rotated passwords from CyberArk are always tried first, with local credentials as fallback.
Supported API modes
Nopesight Scanner supports two CyberArk API modes:
| Feature | CCP (Recommended) | PVWA |
|---|---|---|
| Authentication | Client certificate or IP whitelisting | Username + password |
| Local secret storage | None (certificate files only) | Single encrypted CyberArk service account password |
| Session management | Stateless (single request) | Token-based (logon/logoff) |
| CyberArk component required | CCP/AIM on IIS | PVWA (standard component) |
| API calls per credential | 1 | 3–4 |
| CyberArk recommendation | Recommended for applications | Recommended for interactive use |
CCP (Central Credential Provider) is the recommended mode for scanner integrations. It is stateless, requires no passwords, and authenticates via client certificates or IP whitelisting.
PVWA (Password Vault Web Access) is supported for organizations that don't have CCP deployed. It requires a CyberArk service account password (stored encrypted on the scanner).
Session caching
During a scan, the scanner caches retrieved credentials in memory to minimize API calls. If the same credential is needed for multiple hosts (e.g., a domain admin account), it is retrieved from CyberArk once and reused for the entire scan session. The cache is automatically cleared when the scan completes, and PVWA sessions are logged off.
Circuit breaker
If CyberArk becomes unreachable during a scan, the scanner automatically disables CyberArk lookups after 3 consecutive failures and falls back to local credentials for the remainder of the scan. This prevents slow scans when CyberArk is temporarily unavailable.
Configuration
Configuration is done in two places within the Nopesight Scanner GUI:
- Integrations tab — Define the CyberArk vault connection (URL, API type, authentication)
- Credentials tab — Create credential routing rules that tell the scanner which CyberArk Safe to query for each protocol and IP range
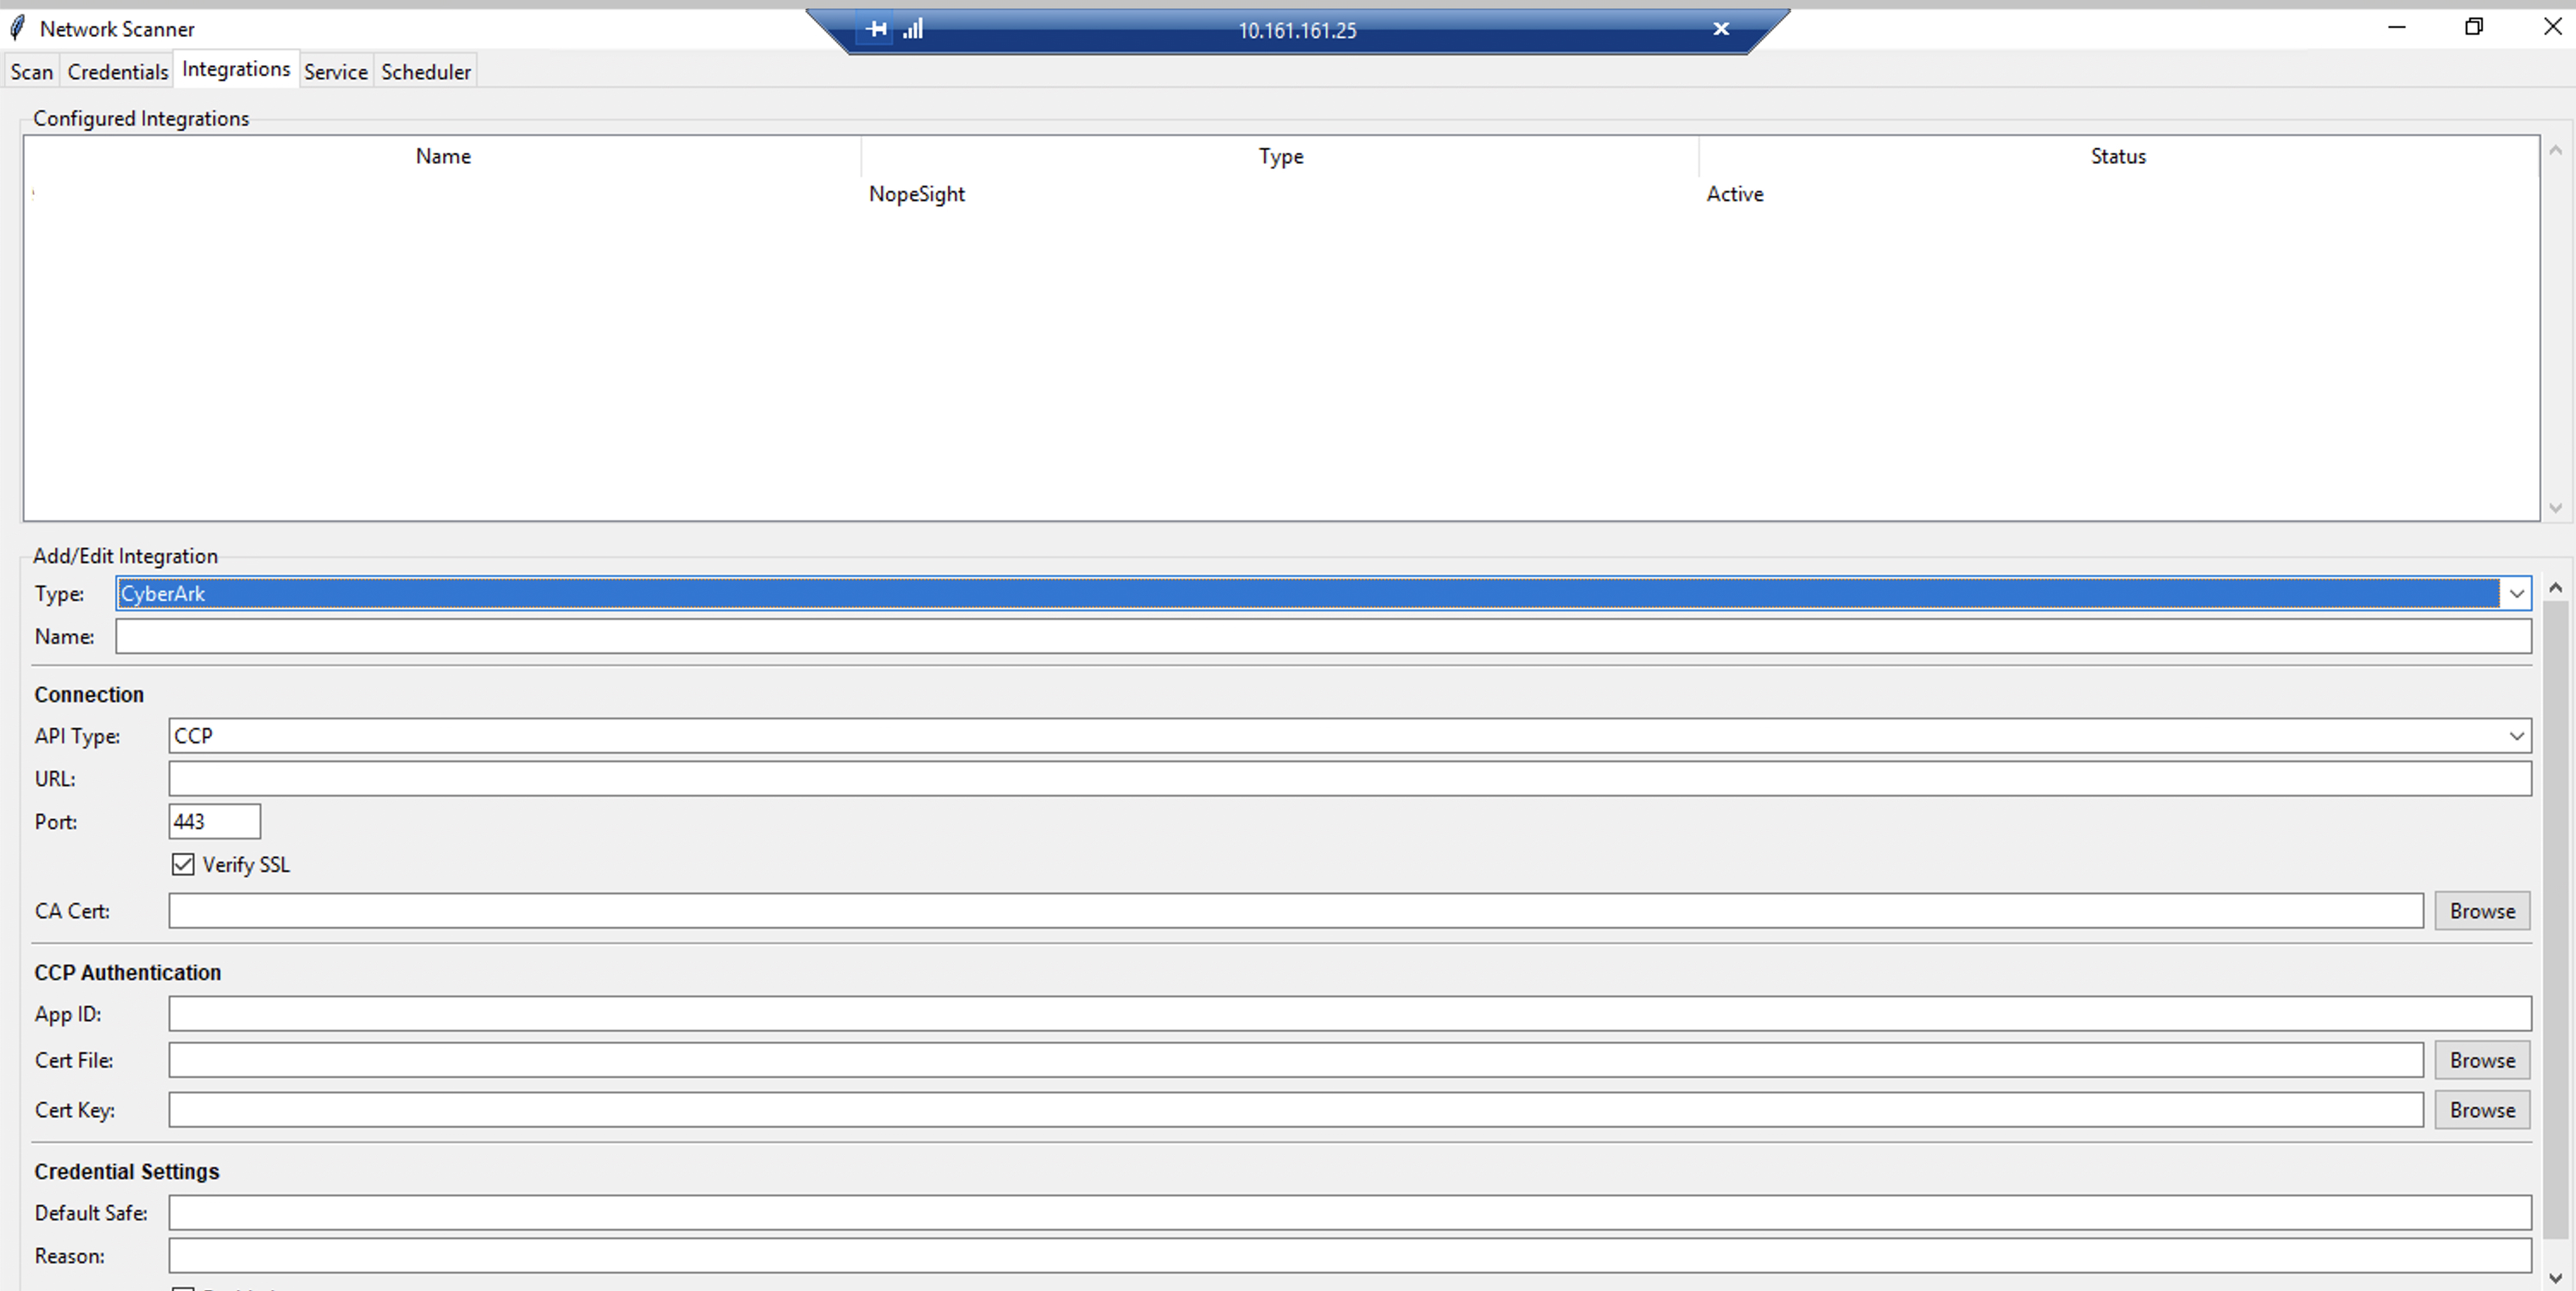
Step 1: Configure the CyberArk connection
The first step is to set up the connection to your CyberArk vault in the Integrations tab. This tells the scanner where your CyberArk server is, how to authenticate, and which API to use.
- Open the Nopesight Scanner application
- Navigate to the Integrations tab
- In the Add/Edit Integration section, select CyberArk from the Type dropdown
- Enter a Name for this integration (e.g., "CyberArk Production Vault")
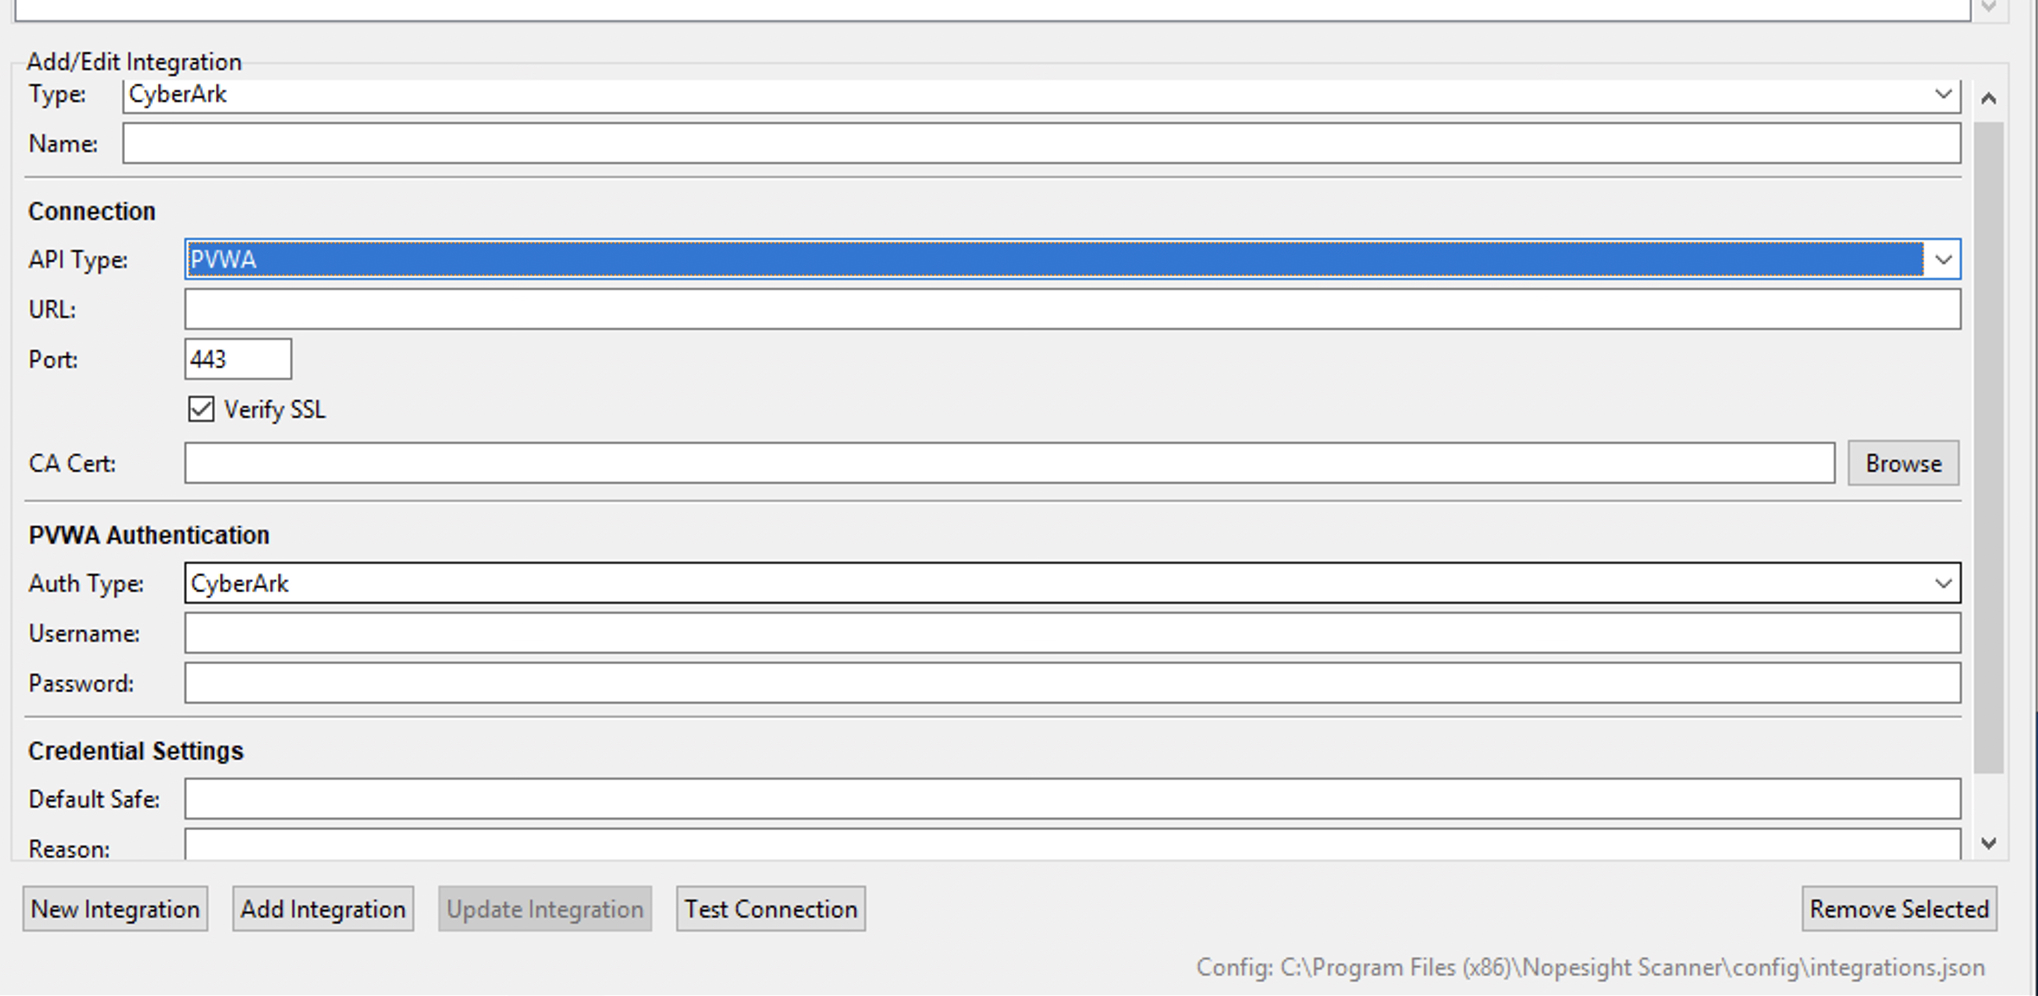
The form dynamically changes based on the API Type you select. Below are both configurations:
CCP mode — shows Connection, CCP Authentication, and Credential Settings:
PVWA mode — shows Connection, PVWA Authentication, and Credential Settings:
Fill in each section based on your CyberArk deployment.
Connection section
These settings define how the scanner connects to your CyberArk server.
| Field | Description |
|---|---|
| API Type | Choose between CCP and PVWA (see comparison above). The form dynamically shows the appropriate authentication fields based on your selection. |
| URL | Your CyberArk server's base URL (e.g., https://cyberark.company.com). This is the hostname of the server hosting either the CCP web service or the PVWA portal. |
| Port | The HTTPS port (default: 443). Only change this if your CyberArk server runs on a non-standard port. |
| Verify SSL | When checked, the scanner verifies the CyberArk server's SSL certificate against trusted Certificate Authorities. Keep this enabled in production. Only disable for testing with self-signed certificates. |
| CA Cert | If your CyberArk server uses a certificate signed by an internal Certificate Authority (not publicly trusted), browse to your CA's root certificate file here. This allows the scanner to trust your internal CA while keeping SSL verification enabled. |
CCP Authentication section
This section appears when API Type is set to CCP. CCP (Central Credential Provider) is CyberArk's recommended method for application-to-application credential retrieval. It is stateless — each credential lookup is a single HTTPS GET request with no session management required.
| Field | Description |
|---|---|
| App ID | The Application Identity registered in your CyberArk vault for this scanner. Your CyberArk administrator creates this in the CyberArk portal under Applications. The App ID acts as the scanner's identity when requesting credentials. Example: NopeSightScanner. |
| Cert File | (Optional) Path to a client certificate file (.pem or .crt) used for mutual TLS authentication. When provided, the scanner presents this certificate during the TLS handshake, and CyberArk verifies it against the certificates registered for the App ID. Click Browse to select the file. |
| Cert Key | (Optional) Path to the private key file (.pem or .key) corresponding to the client certificate above. Click Browse to select the file. |
How CCP authentication works:
CyberArk CCP supports multiple authentication methods that can be combined for stronger security. Your CyberArk administrator configures which methods are required for your App ID:
- Client certificate — The scanner presents a TLS client certificate. CyberArk validates it against the certificate registered for the App ID. This is the most secure option and eliminates any need for passwords.
- IP whitelisting — CyberArk only accepts requests from specific source IP addresses registered for the App ID. If this is your only authentication method, leave the Cert File and Cert Key fields empty.
- Combined — Your administrator can require both certificate and IP whitelisting for maximum security.
- Certificate authentication is preferred for production environments — it provides strong cryptographic identity verification.
- IP whitelisting is simpler to set up and works well when the scanner runs on a fixed IP address. However, it provides weaker security since IP addresses can be spoofed on compromised networks.
- Both combined provides defense in depth and is recommended for high-security environments.
PVWA Authentication section
This section appears when API Type is set to PVWA. PVWA (Password Vault Web Access) is CyberArk's web portal API. It uses username/password authentication and token-based sessions.
PVWA is designed primarily for interactive (human) use. CyberArk recommends CCP for application integrations. However, PVWA is supported for organizations that do not have the CCP component deployed. If you have CCP available, prefer it over PVWA.
| Field | Description |
|---|---|
| Auth Type | The authentication method for the CyberArk service account. Choose based on how the account is configured in your CyberArk environment: |
| - CyberArk — Local CyberArk user account (created directly in the CyberArk vault) | |
| - LDAP — Active Directory / LDAP-authenticated account (the account exists in AD and CyberArk authenticates against your LDAP directory) | |
| - RADIUS — RADIUS-authenticated account (used when CyberArk is configured with a RADIUS server, often for multi-factor authentication) | |
| Username | The CyberArk service account username. This account must have permission to retrieve passwords from the Safes you plan to use. Example: svc_nopesight. |
| Password | The service account password. This is the only secret stored locally when using PVWA mode — it is automatically encrypted with Fernet encryption when saved and stored in the integration configuration file. The password is never stored in plaintext. |
How PVWA authentication works:
When the scanner needs a credential during a scan, it follows this sequence:
- Authenticate — The scanner sends the username/password to CyberArk's logon endpoint and receives a session token
- Search — Using the session token, the scanner searches for the target account in the specified Safe
- Retrieve — The scanner retrieves the actual password for the matched account
- Logoff — After the scan completes, the scanner logs off the PVWA session
The session token is cached for the duration of the scan, so the scanner only authenticates once per scan session regardless of how many credentials it retrieves.
Credential Settings section
These settings apply to both CCP and PVWA modes.
| Field | Description |
|---|---|
| Default Safe | (Optional) A fallback Safe name. If a credential routing rule in the Credentials tab does not specify a Safe, the scanner uses this default. Leave empty if all your credential rules explicitly specify their Safe. |
| Reason | (Optional) An audit reason string sent with every credential retrieval request. This appears in CyberArk's audit logs, making it easy to identify which retrievals came from the scanner. Example: NopeSight Discovery Scan. |
| Enabled | Master toggle for this integration. When unchecked, all CyberArk credential rules are skipped during scans and the scanner falls back to local credentials only. Useful for temporarily disabling CyberArk without deleting the configuration. |
- Click Test Connection to verify the scanner can reach your CyberArk server and authenticate successfully
- Click Save to store the integration
Always use Test Connection before running a scan. For CCP, this verifies the App ID and certificate are accepted. For PVWA, this performs a full authentication and logoff cycle. If the test fails, check the error message and review the Troubleshooting section.
Step 2: Create credential routing rules
After configuring the CyberArk connection, create credential routing rules in the Credentials tab. These rules tell the scanner which CyberArk Safe and lookup parameters to use for each scan protocol and IP range combination.
The Credentials tab shows all saved credentials in a table with columns: Source, Protocol, IP Range, Username / Safe, Pri (priority), and Active.
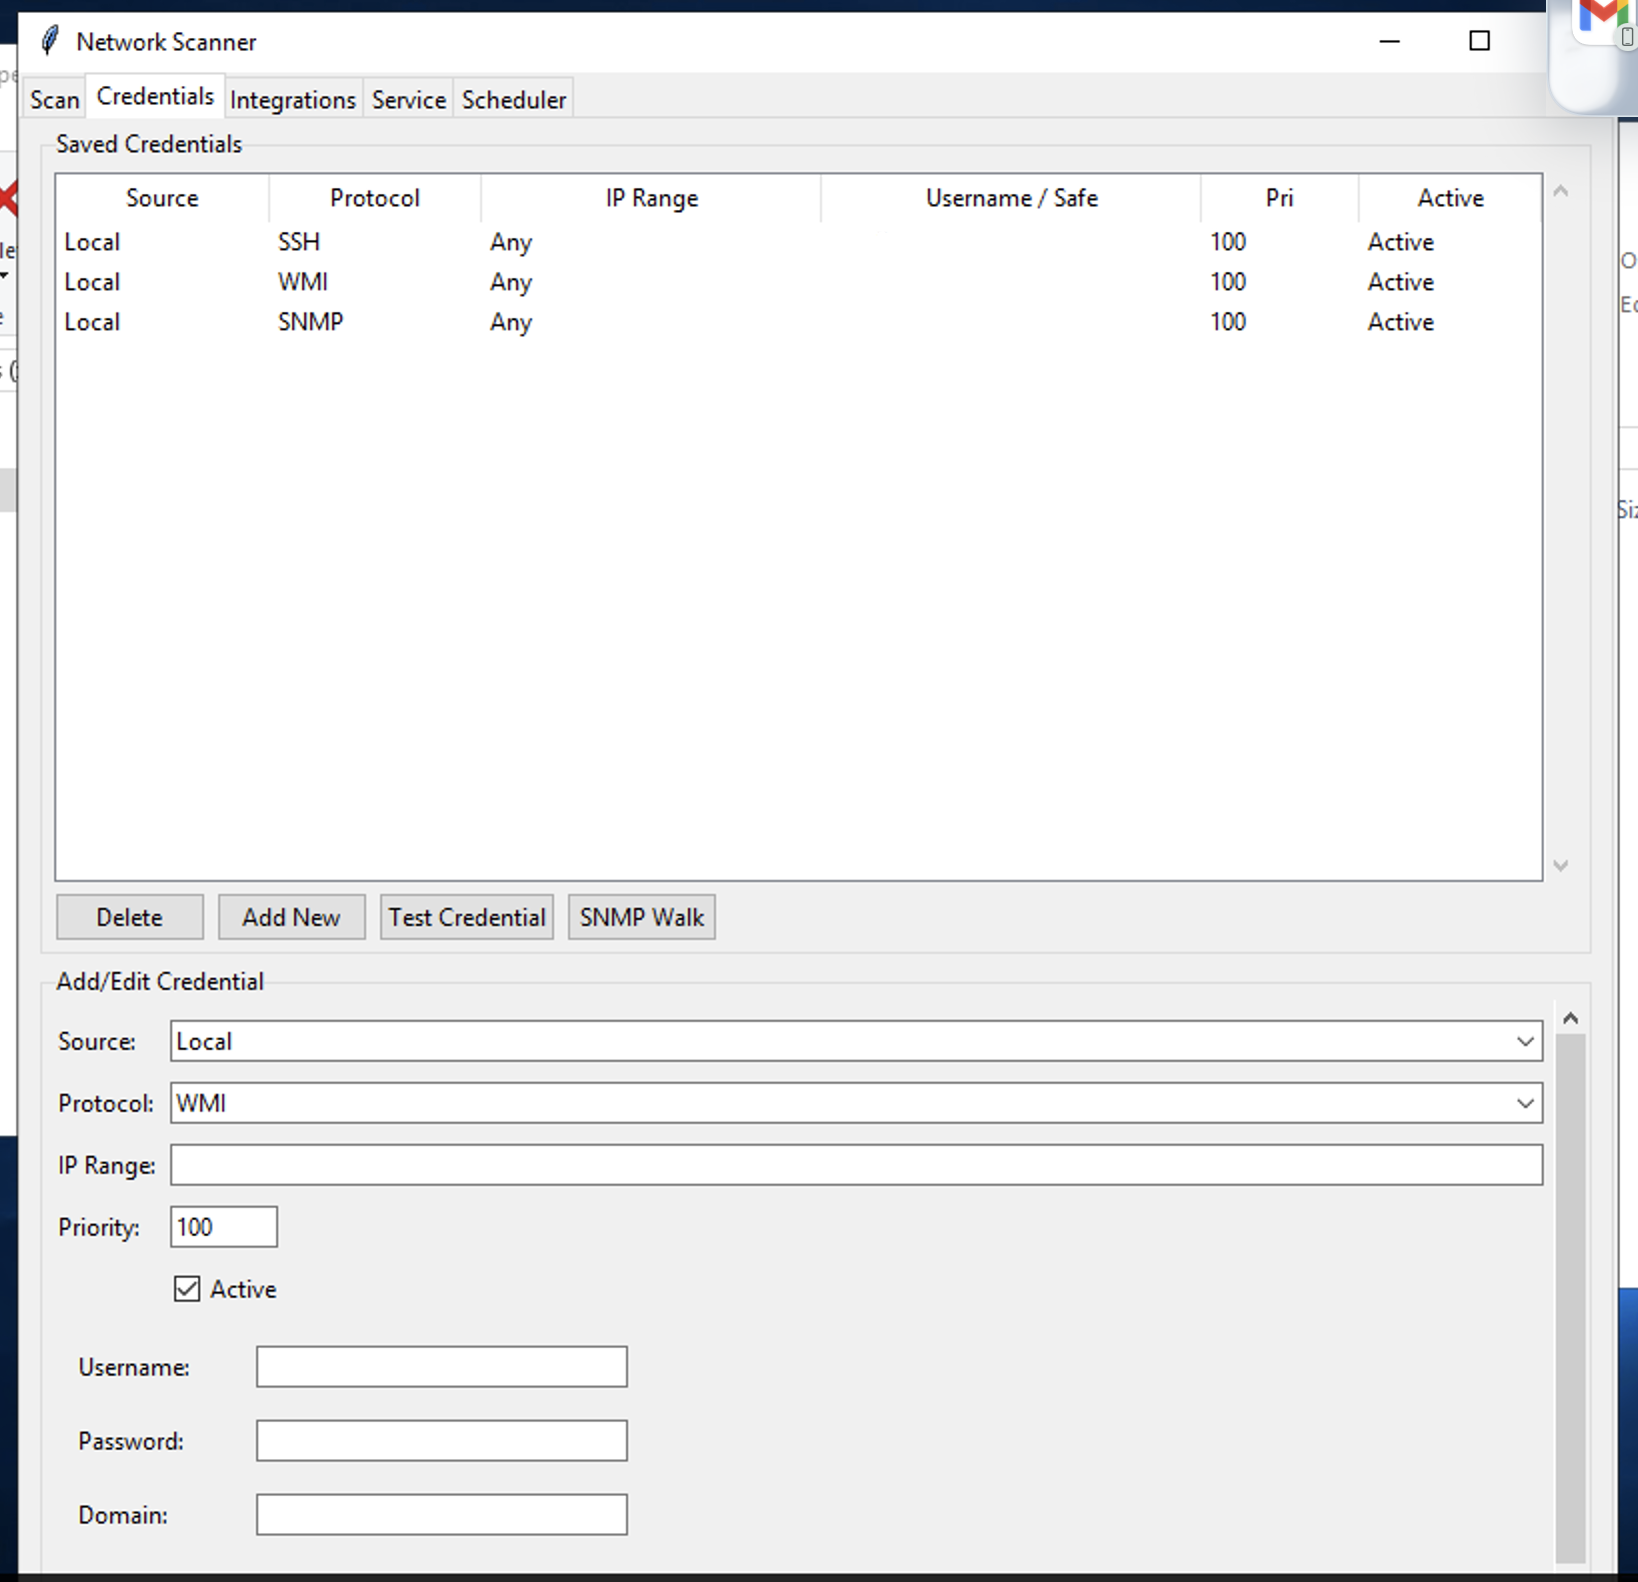
To add a CyberArk credential rule:
- In the Add/Edit Credential section at the bottom, open the Source dropdown
- Select CyberArk (other options: Local, Delinea, BeyondTrust)

- The form changes to show CyberArk-specific lookup fields:
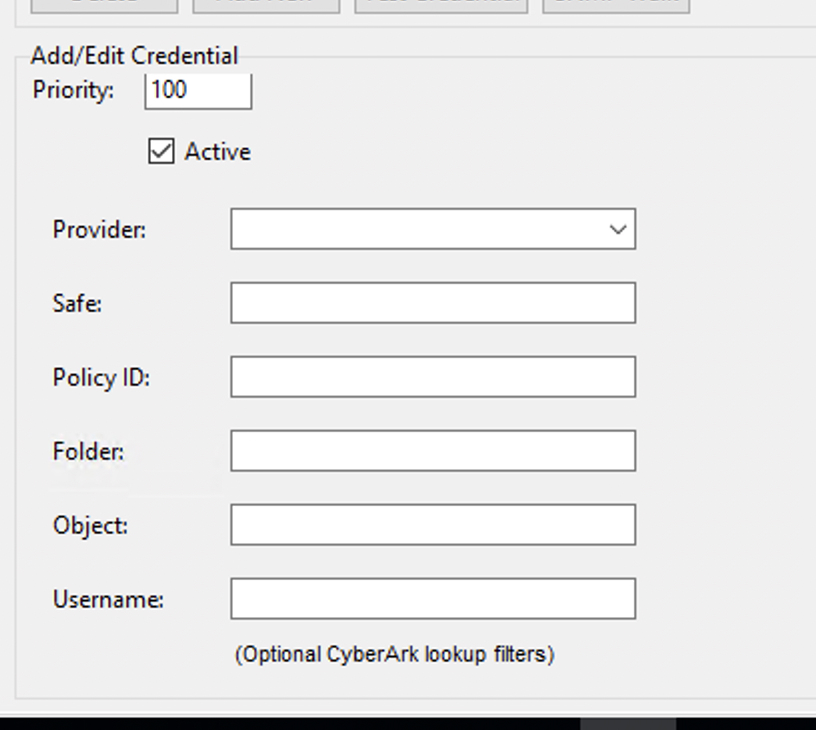
- Configure the rule fields:
| Field | Required | Description |
|---|---|---|
| Protocol | Yes | Scan protocol: WMI, SSH, SNMP, or vCenter |
| IP Range | Yes | Target IP range (CIDR notation, single IP, or * for any) |
| Priority | No | Lower number = higher priority (default: 100) |
| Provider | Yes | Select the CyberArk integration you configured in Step 1 |
| Safe | Yes | CyberArk Safe containing the target credentials |
| Policy ID | No | CyberArk Platform/PolicyID filter (e.g., WinDomain, UnixSSH) |
| Folder | No | Folder within the Safe (default: Root) |
| Object | No | Specific account object name in CyberArk |
| Username | No | Filter by specific username in CyberArk |
The last four fields (Policy ID, Folder, Object, Username) are optional CyberArk lookup filters — use them to narrow down the account if a Safe contains multiple credentials for the same target IP.
- Click Add New to save the rule
Example credential rules setup
A typical enterprise configuration might look like:
| Source | Protocol | IP Range | Safe | Priority | Notes |
|---|---|---|---|---|---|
| CyberArk | WMI | 10.0.0.0/8 | WindowsAdmins | 10 | Primary: Domain admin from CyberArk |
| CyberArk | SSH | 172.16.0.0/12 | LinuxRoot | 10 | Primary: Root credentials from CyberArk |
| CyberArk | WMI | * | GeneralWin | 50 | Catchall: Any Windows system |
| Local | WMI | 10.0.0.0/8 | — | 100 | Fallback: Local credential if CyberArk fails |
| Local | SSH | * | — | 100 | Fallback: Local SSH credential |
With this setup:
- Scanning a Windows server at
10.1.1.5tries the CyberArkWindowsAdminsSafe first (priority 10), then theGeneralWinSafe (priority 50), and finally the local fallback (priority 100) - Scanning a Linux server at
172.16.5.20tries the CyberArkLinuxRootSafe first, then the local SSH fallback
CyberArk prerequisites
Before configuring the integration, ensure the following CyberArk-side setup is complete:
For CCP mode
- Install CCP/AIM on an IIS server (if not already deployed)
- Register an Application (AppID) for the scanner (e.g.,
NopeSightScanner) - Configure authentication on the AppID:
- Client certificate: Issue a certificate for the scanner machine and register it with the AppID
- IP whitelisting: Register the scanner machine's IP address(es) with the AppID
- Grant Safe access: Authorize the AppID to access the required Safes
For PVWA mode
- Create a service account in CyberArk (e.g.,
svc_nopesight) - Grant Safe access: Authorize the service account to retrieve passwords from the required Safes
- Enable password retrieval permission on the account's Safe membership
Protocol-to-PolicyID mapping
CyberArk uses PolicyID (Platform ID) to categorize accounts. Common mappings:
| Scanner Protocol | CyberArk PolicyID | Description |
|---|---|---|
| WMI | WinDomain, WinLocalAdmin | Windows domain or local admin accounts |
| SSH | UnixSSH, UnixSSHKeys | Linux/Unix accounts |
| SNMP | CiscoSNMP, NetworkDevice | Network device community strings |
| vCenter | VMwareVCenter | VMware vCenter admin accounts |
These are configurable per CyberArk deployment and can be specified in credential rules using the Policy ID field.
Security considerations
Credential storage by mode
| Data | CCP Mode | PVWA Mode |
|---|---|---|
| Target system passwords | Never stored locally | Never stored locally |
| CyberArk connection config (URL, AppID) | Stored in integrations.json (non-sensitive) | Stored in integrations.json (non-sensitive) |
| Client certificate + key | Stored on filesystem | Not applicable |
| CyberArk service account password | Not applicable | Stored encrypted (Fernet) |
| Retrieved passwords | In-memory only, cleared after scan | In-memory only, cleared after scan |
Best practices
- Prefer CCP over PVWA — CCP eliminates local password storage entirely
- Use client certificates — Stronger authentication than IP whitelisting alone
- Set audit reasons — Configure the "Reason" field so credential retrievals are traceable in CyberArk logs
- Use specific Safe rules — Avoid wildcard IP ranges with broad Safes; use targeted rules for better security
- Keep local fallbacks — Maintain local credentials as fallback to prevent scan failures during CyberArk outages
- Restrict certificate file permissions — Ensure client certificate and key files are readable only by the scanner service account
Troubleshooting
Connection test fails
| Error | Cause | Solution |
|---|---|---|
| SSL error | Certificate verification failed | Check CA certificate path, or ensure CyberArk certificate is trusted |
| Connection failed | Cannot reach CyberArk server | Verify URL, port, and firewall rules |
| Authentication failed (CCP) | AppID not authorized | Verify AppID is registered and scanner IP/cert is allowed |
| Authentication failed (PVWA) | Invalid credentials | Verify service account username and password |
Credential retrieval fails during scan
| Error | Cause | Solution |
|---|---|---|
| "No safe specified" | Rule missing Safe field and no default Safe configured | Add Safe to the credential rule or set a Default Safe |
| CCP 403 | AppID not authorized for the Safe | Grant AppID access to the Safe in CyberArk |
| CCP 409 | Multiple accounts match | Add PolicyID, Username, or Object filter to narrow the match |
| CCP 404 | No matching account in CyberArk | Verify the account exists in the specified Safe with the correct Address |
| "Disabled for this scan session" | 3+ consecutive failures triggered circuit breaker | Check CyberArk connectivity; scanner will retry on next scan |
Scanner log messages
CyberArk-related log entries use the CyberArk: prefix. Check the scanner logs for:
CyberArk CCP: GET ...— CCP API call detailsCyberArk PVWA: Searching accounts ...— PVWA search activityCyberArk: Retrieved credential ...— Successful credential retrievalCyberArk: Cache hit ...— Credential served from session cacheCyberArk: Disabled for this scan session ...— Circuit breaker activated
Other PAM integrations
The scanner's credential provider framework also supports Delinea (formerly Thycotic Secret Server) and BeyondTrust integrations using the same architecture. Each vendor has its own integration type in the Integrations tab and vendor-specific fields in the Credentials tab, but the priority-based resolution pipeline works identically across all providers.