Zone Configuration
This guide covers how to configure network zones to enforce security policies and detect unauthorized traffic.
Understanding Zones
What is a network zone?
A network zone represents a logical grouping of IP addresses that share common security requirements. Zones are automatically created from your discovery schedules, giving you an immediate view of your network segments without manual setup.
Zone properties
Each zone carries the following properties, some populated automatically from discovery and others set by you during configuration.
| Property | Source | Description |
|---|---|---|
| Name | Discovery Schedule | Identifier for the zone |
| IP Range | Discovery Schedule | Network range in CIDR notation (for example, 10.160.160.0/24) |
| Agent | Discovery Schedule | Managing discovery agent |
| Zone Type | Configuration | Security classification |
| Security Level | Configuration | Protection priority |
| Allowed Inbound | Configuration | Permitted source zones |
| Color | Configuration | Visual identifier |
| Description | Configuration | Human-readable notes |
Zone Types
Choose the zone type that best describes the network segment.
Production
Use for: Business-critical systems, databases, application servers
- Contains live business data
- Requires high availability
- Subject to change control
- Needs strict access controls
DMZ
Use for: Internet-facing services, web servers, API gateways
- Exposed to external networks
- First line of defense
- Should have limited internal access
- Requires frequent security updates
Management
Use for: Administrative access, monitoring systems, jump servers
- Privileged access point
- Should access all other zones
- Tightly controlled membership
- Audit logging is critical
Workstation
Use for: End-user devices, desktops, laptops
- High risk for compromise
- Should have limited server access
- Subject to user activity
- Needs endpoint protection
IoT
Use for: Cameras, sensors, smart devices, industrial controls
- Often unpatched or unpatchable
- Limited security capabilities
- Should be heavily isolated
- Potential entry point for attackers
Guest
Use for: Visitor networks, public WiFi, contractor access
- Untrusted devices
- Should only access the internet
- No access to internal systems
- Limited bandwidth and services
Development
Use for: Developer workstations, build servers, test environments
- Rapid changes expected
- May contain sensitive code
- Should not access production data
- Separate from production networks
Staging
Use for: Pre-production testing, UAT environments
- Mirrors production setup
- May contain production-like data
- Used for final testing
- Should not be internet-accessible
Backup
Use for: Backup servers, archive storage, disaster recovery
- Contains copies of all data
- Critical for recovery
- Should have limited network access
- Often isolated for ransomware protection
Security Levels
Each zone is assigned a security level that determines the severity of alerts generated when a policy violation occurs.
Critical
When to use: Zones containing the most sensitive data or systems
- Payment processing systems
- Healthcare records
- Financial databases
- Authentication servers
Violations in Critical zones generate HIGH severity alerts.
High
When to use: Important systems requiring strong protection
- Application servers
- Email systems
- File servers
- Directory services
Violations in High zones generate MEDIUM severity alerts.
Medium
When to use: Standard business systems
- Development environments
- Internal tools
- Collaboration systems
Violations in Medium zones generate MEDIUM severity alerts.
Low
When to use: Less sensitive systems
- Guest networks
- Public-facing information
- Non-critical services
Violations in Low zones generate LOW severity alerts.
Configuring Allowed Inbound
Understanding allowed inbound
The Allowed Inbound setting defines which zones are permitted to initiate connections TO this zone. Any traffic arriving from a zone not on the allowed list is flagged as a policy violation.
Configuration rules
| Allowed Inbound State | Behavior |
|---|---|
| Empty (none selected) | All zones are allowed -- no violations are generated |
| One or more selected | Only selected zones are allowed -- all others generate violations |
Best practices
- Start with allow all -- Leave the Allowed Inbound list empty initially so you can observe actual traffic patterns before enforcing restrictions.
- Analyze traffic -- Use the Traffic Analysis view to understand normal flows between zones.
- Implement gradually -- Add allowed zones one at a time, monitoring for unintended disruptions.
- Document decisions -- Use the Description field to record why specific zones are permitted.
Example: Securing a database zone
Consider a database zone that holds critical business data. A well-configured zone might look like this:
Zone: Database_Servers IP Range: 10.160.160.0/24 Security Level: Critical
Allowed Inbound zones and justifications:
| Allowed Zone | Reason |
|---|---|
| App_Servers | Application tier needs database access |
| Management | Admin access for maintenance |
| Backup | Backup jobs need database access |
Zones that would trigger violations:
| Blocked Zone | Reason |
|---|---|
| Workstations | Users should access databases through applications, not directly |
| DMZ | Internet-facing services should not reach databases |
| IoT | No legitimate need for database access |
| Guest | Untrusted network with no business need |
Configuration Workflow
Step 1: Assess current state
- Navigate to Network Zones.
- Review all discovered zones.
- Check Traffic Analysis for current flows.
- Identify which zones should be protected.
Step 2: Classify zones
For each zone:
- Click the Edit button.
- Select the appropriate Zone Type.
- Select the appropriate Security Level.
- Add a helpful Description.
- Choose a distinctive Color.
- Click Save.
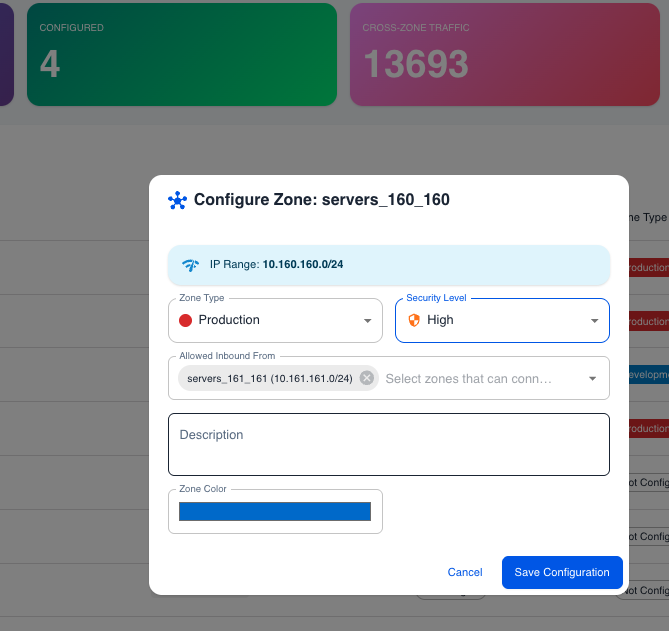 Zone configuration dialog showing zone type, security level, and allowed inbound settings
Step 3: Define policies
For high-security zones:
- Click the Edit button.
- In Allowed Inbound, select the permitted zones.
- Review the selection carefully.
- Click Save.
Step 4: Monitor violations
- Switch to the Violations tab.
- Review any detected violations.
- Investigate each violation.
- Update policies or block traffic as appropriate.
Bulk Configuration Tips
Common patterns
Hub and Spoke
In this pattern, a central Management zone can reach everything, while all other zones only accept traffic from Management.
- Management Zone -- Allowed Inbound is left empty (all zones allowed).
- All other zones -- Allowed Inbound is set to Management Zone only.
Tiered Architecture
This pattern mirrors a classic three-tier application deployment.
- Web Tier (DMZ) -- Accepts traffic from the internet (implicit).
- App Tier -- Allowed Inbound is set to Web Tier and Management.
- Data Tier -- Allowed Inbound is set to App Tier, Backup, and Management.
Zero Trust Segments
This pattern starts with maximum restriction and requires explicit approval for every flow.
- Each zone -- Allowed Inbound is set to Management only.
- All inter-zone traffic generates violations.
- New flows require explicit review and approval before being added to the allowed list.
Troubleshooting
Violations not appearing
| Possible Cause | Solution |
|---|---|
| Allowed Inbound is empty | Select specific zones to restrict access. An empty list means all traffic is permitted. |
| Source zone is in the Allowed Inbound list | Remove the zone from the list if its traffic should be blocked. |
Too many violations
| Possible Cause | Solution |
|---|---|
| Legitimate traffic is not in the Allowed Inbound list | Review the traffic and add legitimate zones to the allowed list. |
| Configuration is too restrictive | Start with broader access and tighten gradually based on observed patterns. |
Zone not editable
| Possible Cause | Solution |
|---|---|
| Insufficient permissions | Contact your administrator for access. |
| Zone belongs to a different tenant | Switch to the correct tenant using the tenant selector. |
Next Steps
- Quick Start - Initial setup guide
- Overview - Complete feature documentation