AI Import
AI Import lets you add assets to your CMDB quickly and accurately — either by uploading a spreadsheet or by simply describing what you want to import in plain English. The AI engine analyzes your data, suggests field mappings, and automatically detects what type of device each row represents.
For implementation-level details, see AI Import Technical Reference.
Why Use AI Import?
- Save time: No need to manually enter assets one by one — bulk import hundreds of items at once
- Reduce errors: AI validates and maps your data automatically, catching mismatches before they reach your database
- Works with what you have: Upload any CSV or Excel file, regardless of column naming — AI figures out what each column means
- Smart device classification: When your data includes manufacturer and model information, the system automatically identifies whether each row is a Server, Workstation, Network Device, Monitor, or other device type
- No spreadsheet? No problem: Describe your assets in natural language and AI creates structured records for you
How to Access AI Import
- In the left-hand menu, navigate to CMDB
- Click AI Import
You will see the Import Wizard — a guided 6-step process that walks you through the entire import.
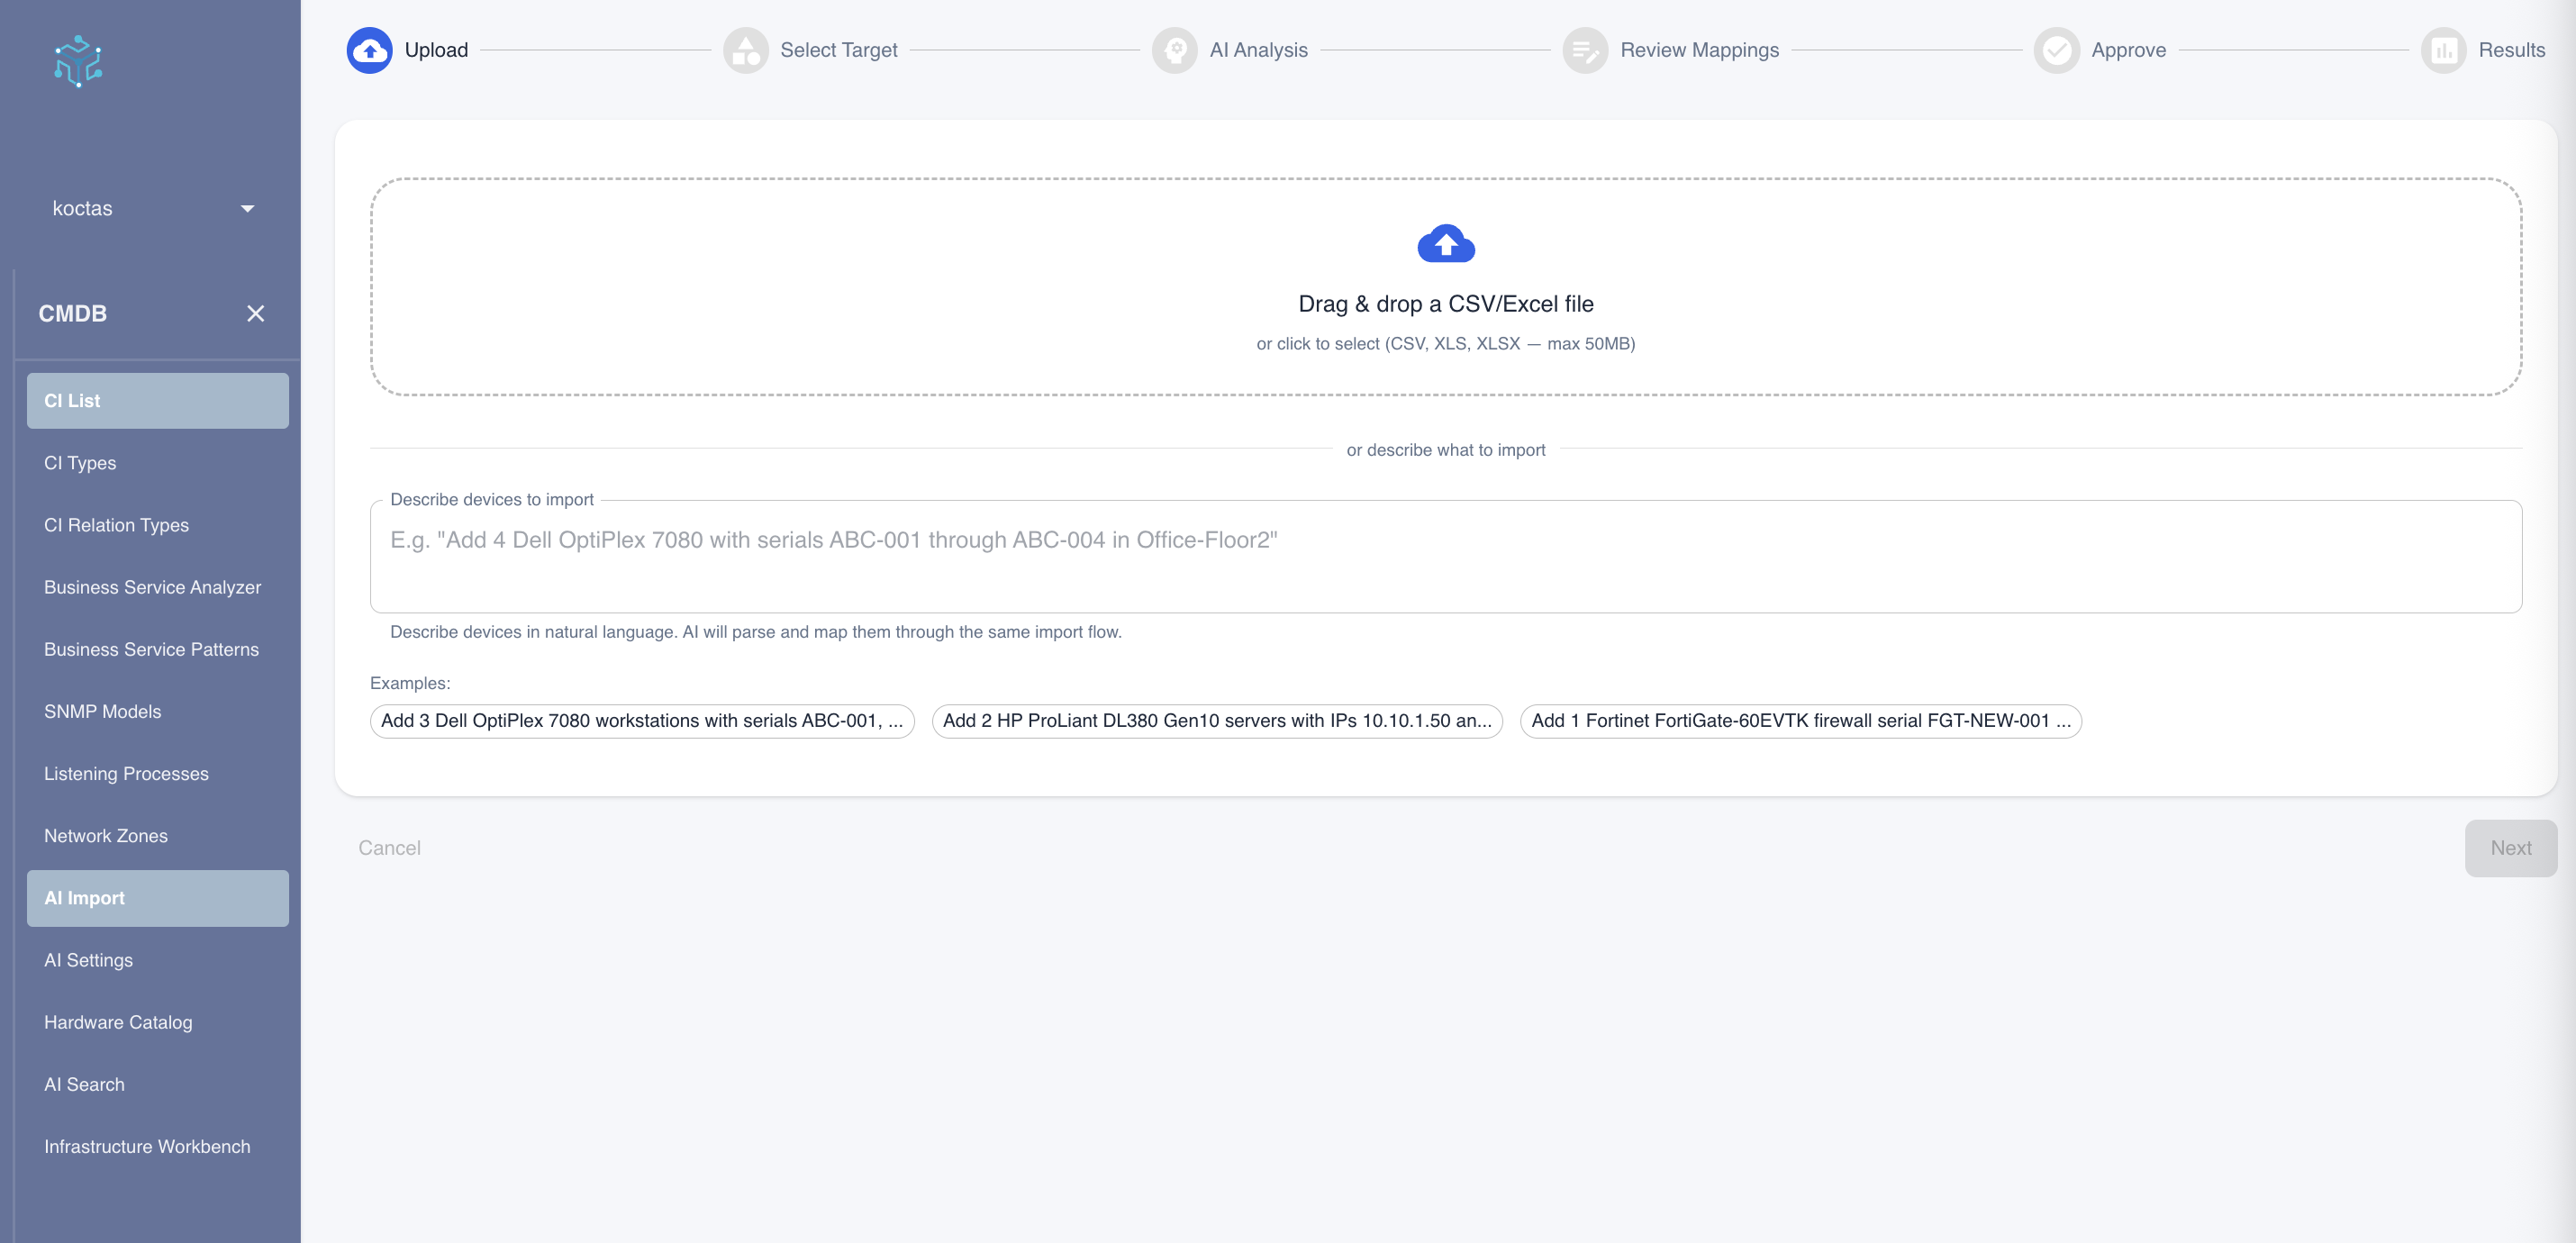 The AI Import page with the 6-step wizard: Upload, Select Target, AI Analysis, Review Mappings, Approve, and Results.
Two Ways to Import
AI Import supports two methods of bringing data into your CMDB. Both methods follow the exact same wizard steps — the only difference is how you provide your data in the first step.
Option 1: Upload a Spreadsheet (CSV / Excel)
Use this method when you have asset data in a file — for example, an inventory export from another system, a vendor delivery list, or a hardware tracking spreadsheet.
Supported formats: CSV, XLS, XLSX (up to 50 MB)
Step-by-step walkthrough
Step 1 — Upload your file
Drag and drop your file onto the upload area, or click to browse and select it. Once uploaded, the file name and size appear in the drop zone.
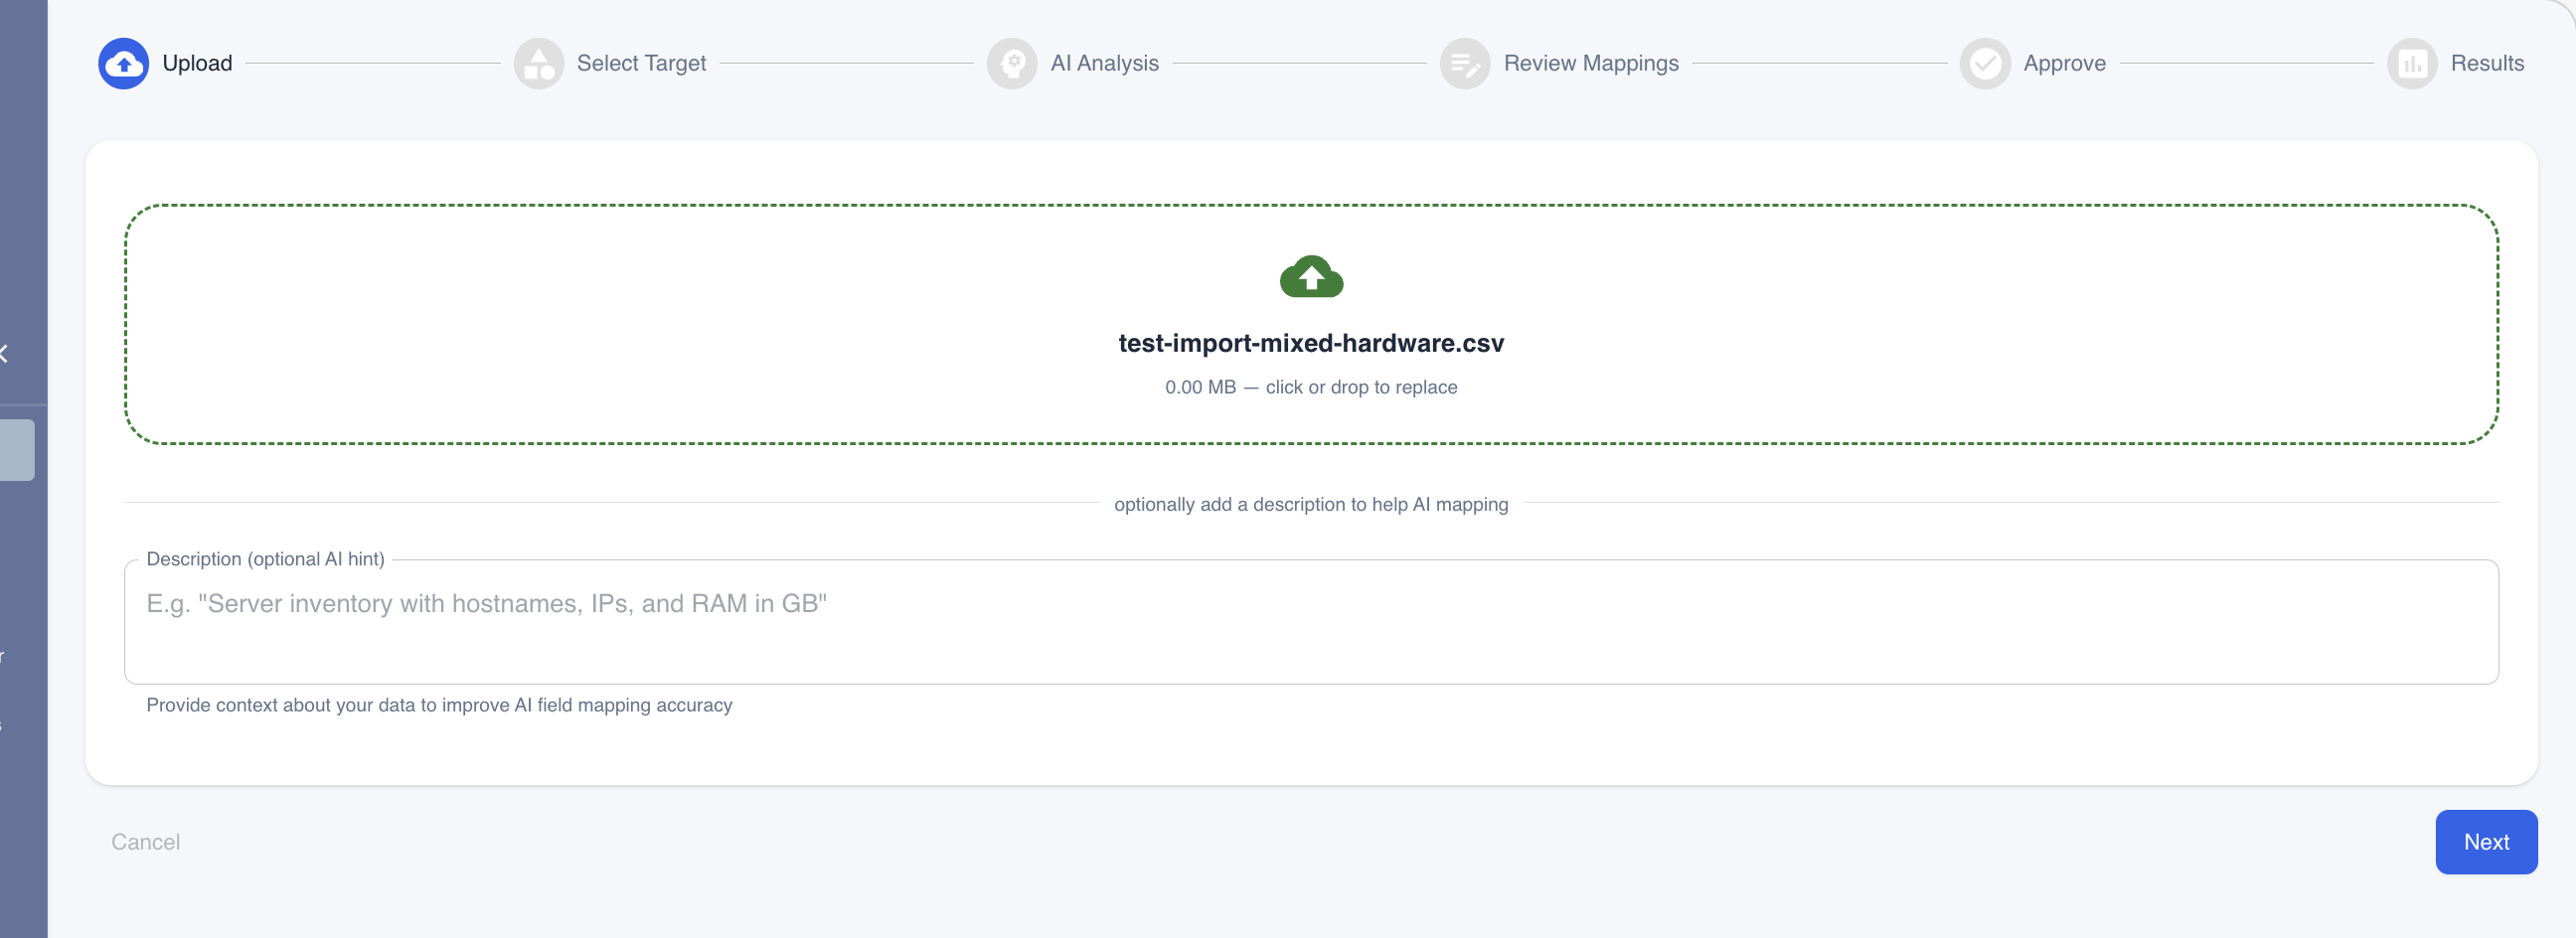 A CSV file has been uploaded. You can optionally add a description to help the AI understand your data better — for example, "Server inventory with hostnames, IPs, and RAM in GB".
If the system recognizes your file format from a previously saved template, it will offer to apply that template automatically, saving you from repeating the mapping step.
Click Next to proceed.
Step 2 — Select import target
Choose what type of data you are importing:
- Configuration Items — Servers, workstations, network devices, monitors, and other infrastructure
- Licenses — Software licenses and contracts
If you selected Configuration Items, you can optionally pick a specific CI Type (e.g., Server, Workstation). This is not required — if your data includes manufacturer and model columns, the system will automatically detect the correct CI type for each row using the Hardware Catalog.
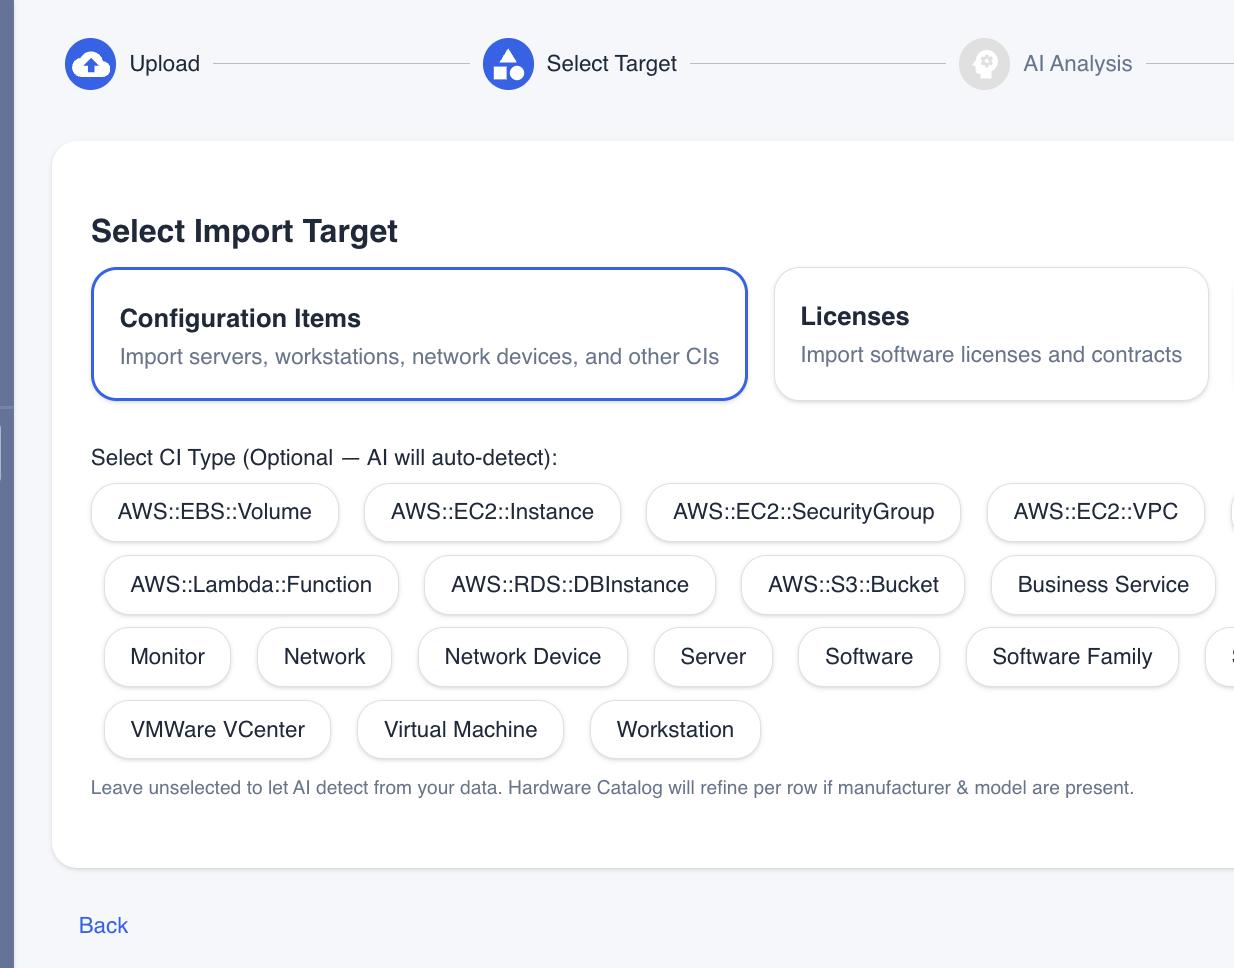 Select your import target. For Configuration Items, you can optionally choose a CI Type, or leave it unselected for AI auto-detection.
Click Next to start the AI analysis.
Step 3 — AI Analysis
The AI engine examines your data — column names, sample values, and data patterns — to understand what each field represents and suggest the best mapping to your CMDB schema.
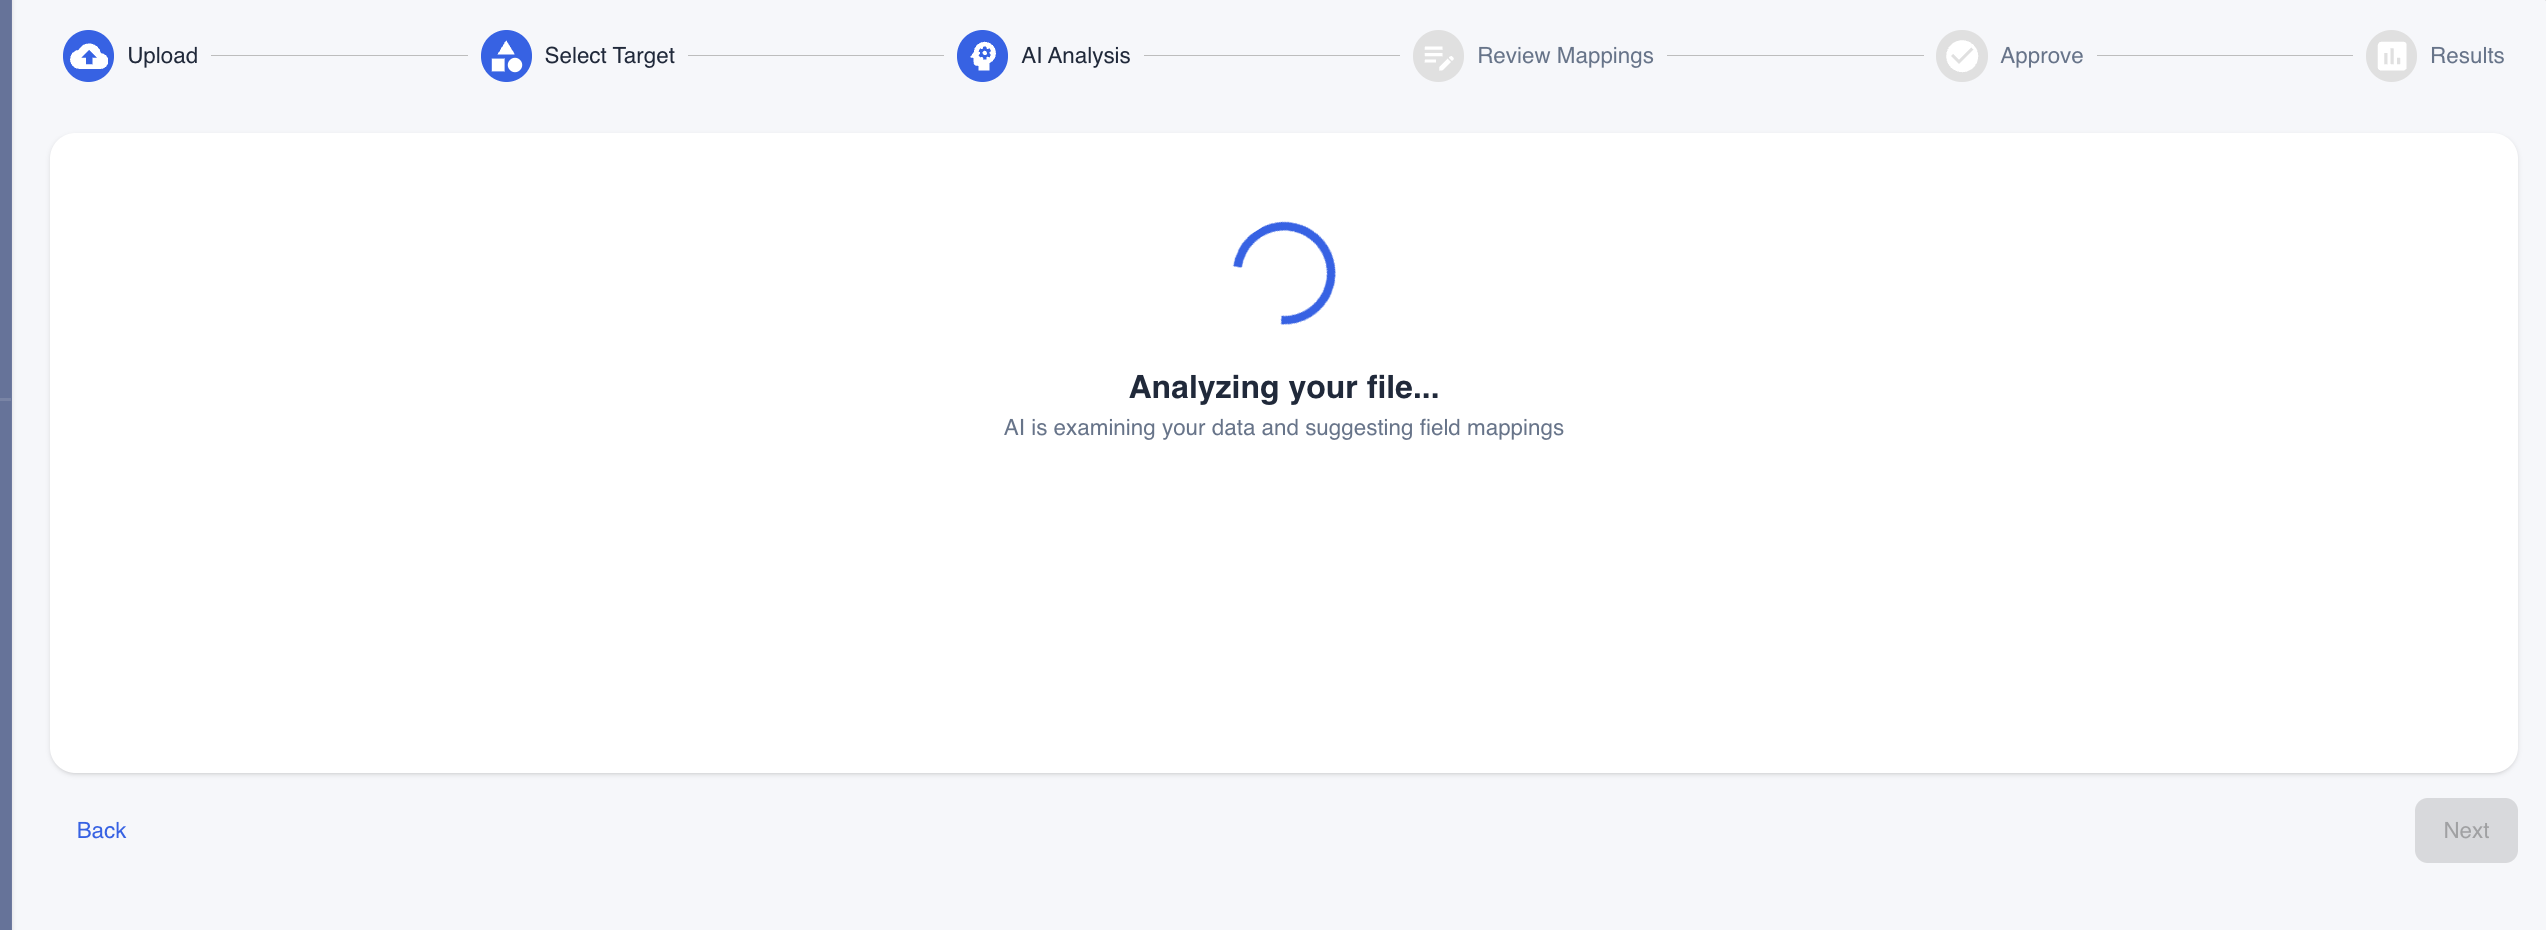 AI is analyzing your file and determining field mappings. This typically takes a few seconds.
The system automatically moves to the next step when analysis is complete.
Step 4 — Review Mappings
This is where you review and fine-tune how your source columns map to CMDB fields. The AI has already pre-filled the mappings based on its analysis, but you have full control to adjust them.
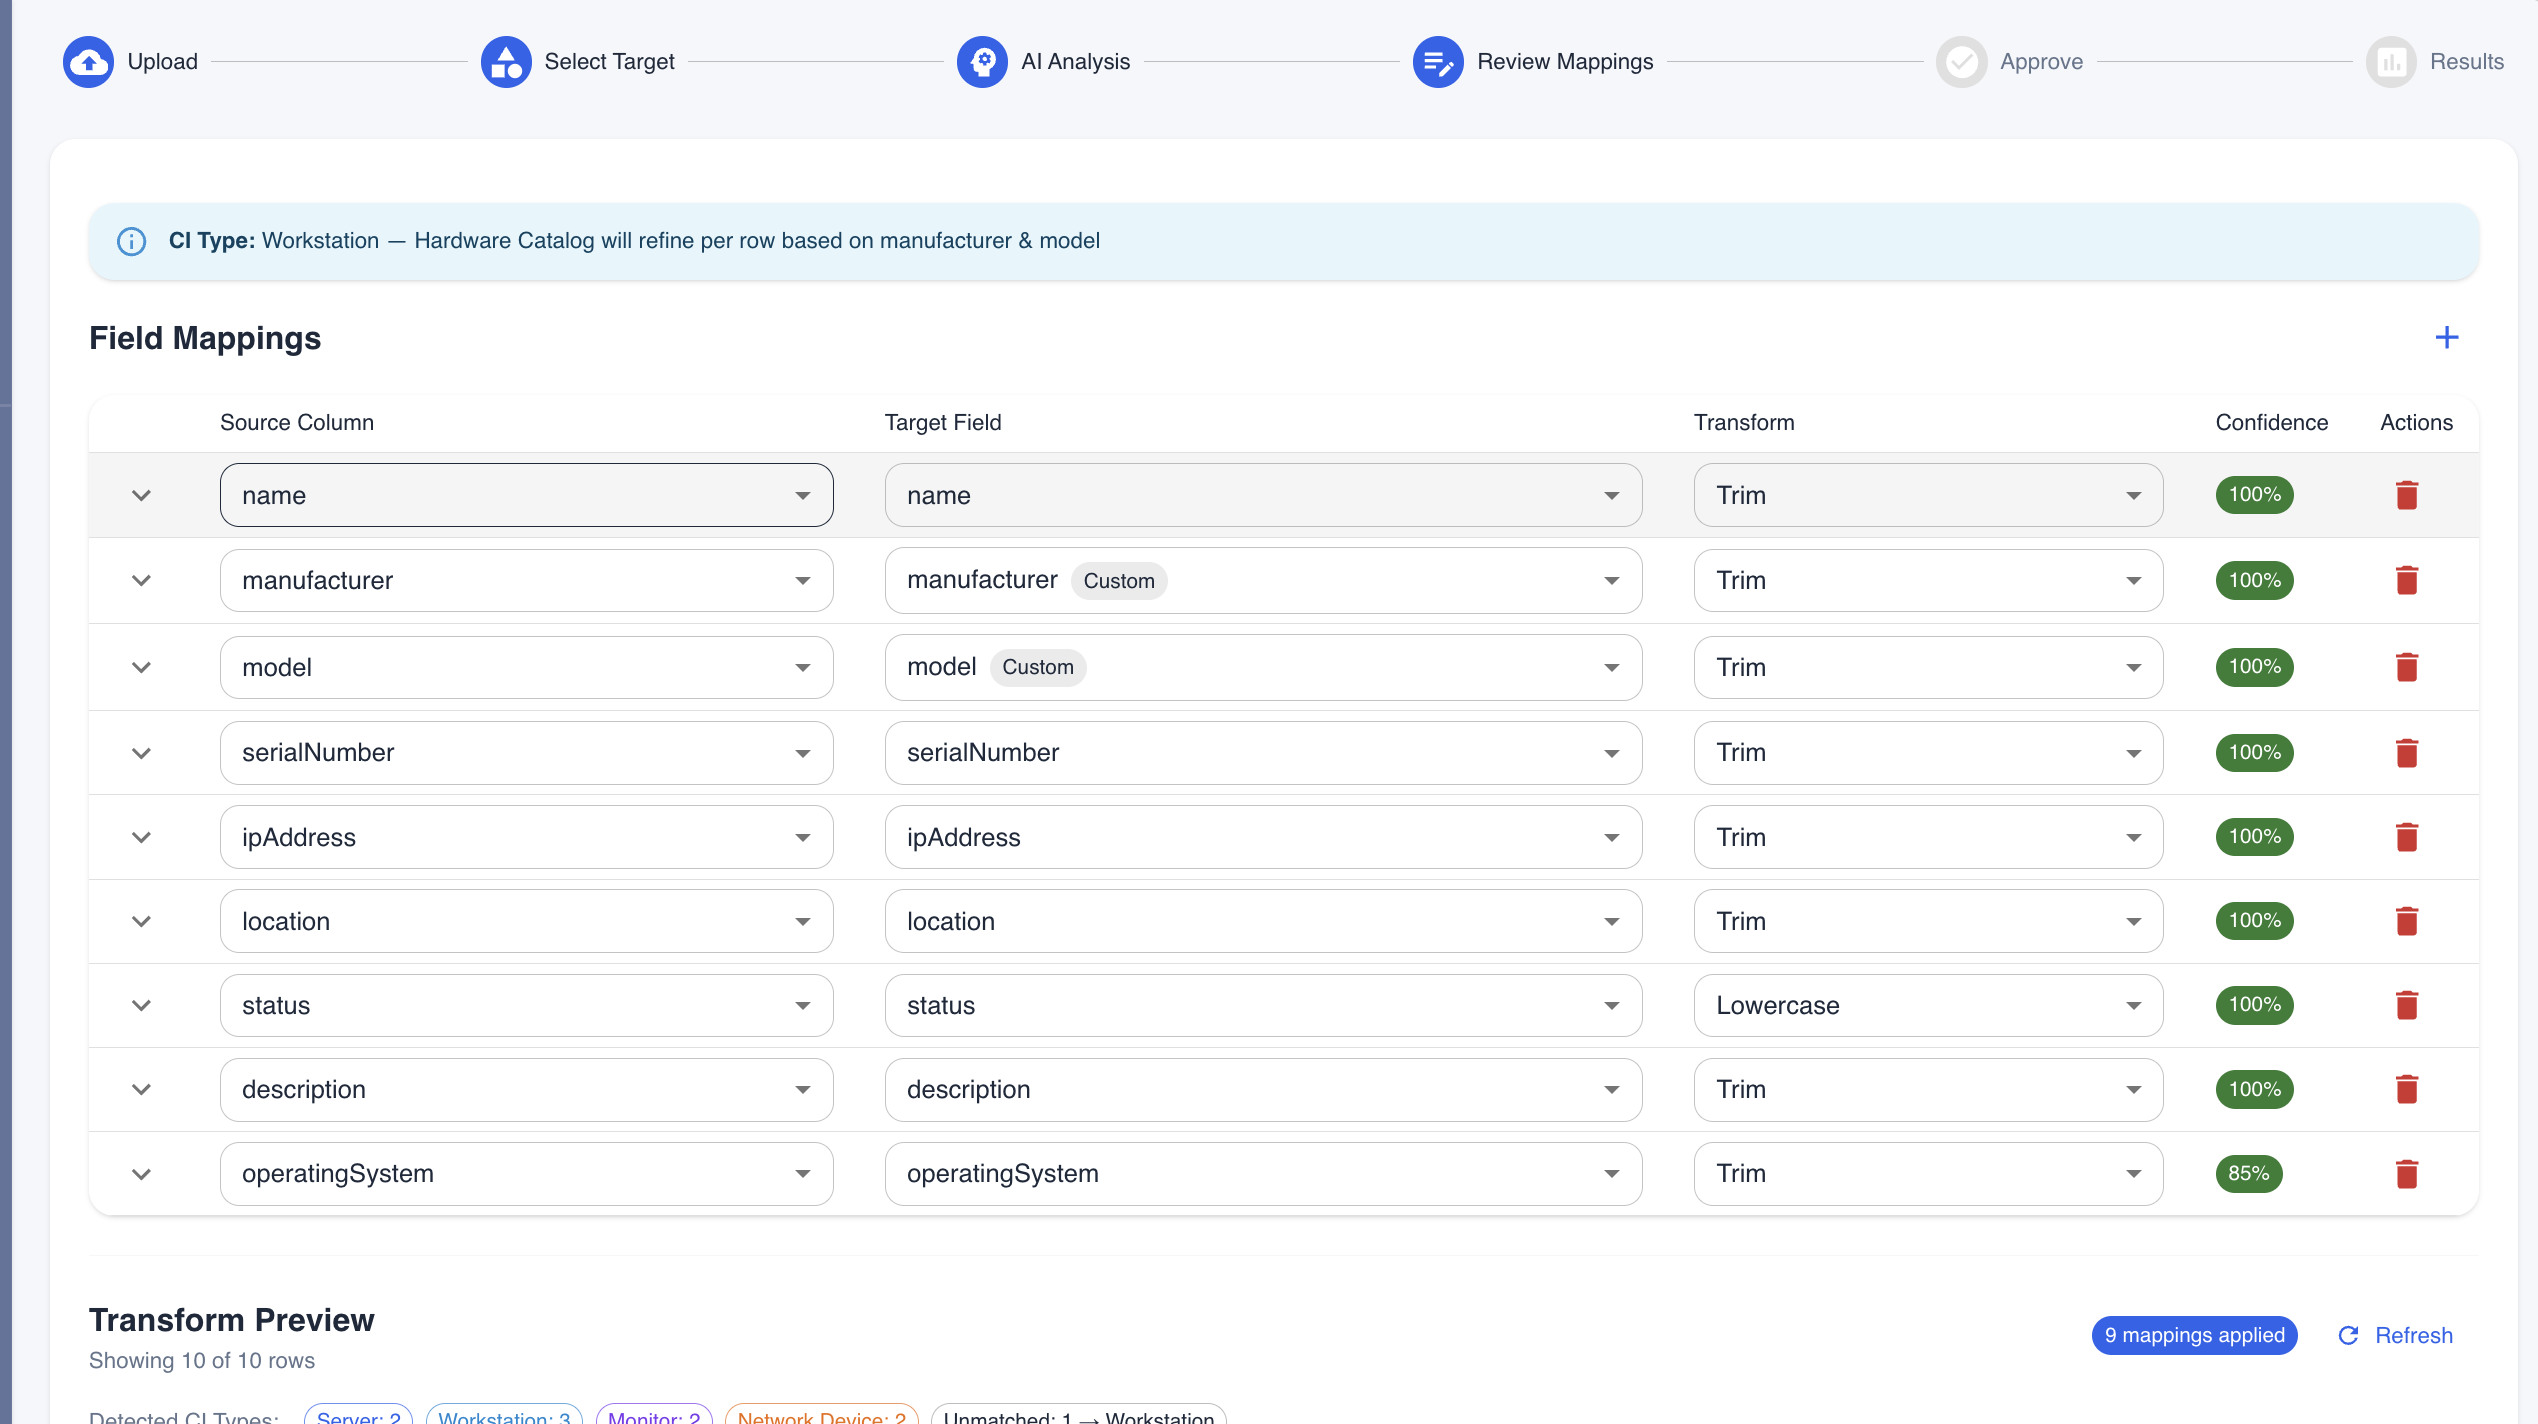 The mapping editor shows each source column paired with a target CMDB field. The Confidence column indicates how sure the AI is about each mapping (green = high confidence). You can change any mapping using the dropdowns.
The mapping editor shows:
- Source Column — The column names from your file
- Target Field — The corresponding CMDB field (editable via dropdown)
- Transform — How the data will be processed (e.g., Trim whitespace, Lowercase, Reference lookup)
- Confidence — AI confidence percentage for the suggested mapping
- Actions — Remove a mapping or add new ones with the + button
Scroll down to see the Transform Preview — a live table showing how your data will look after the mappings are applied.
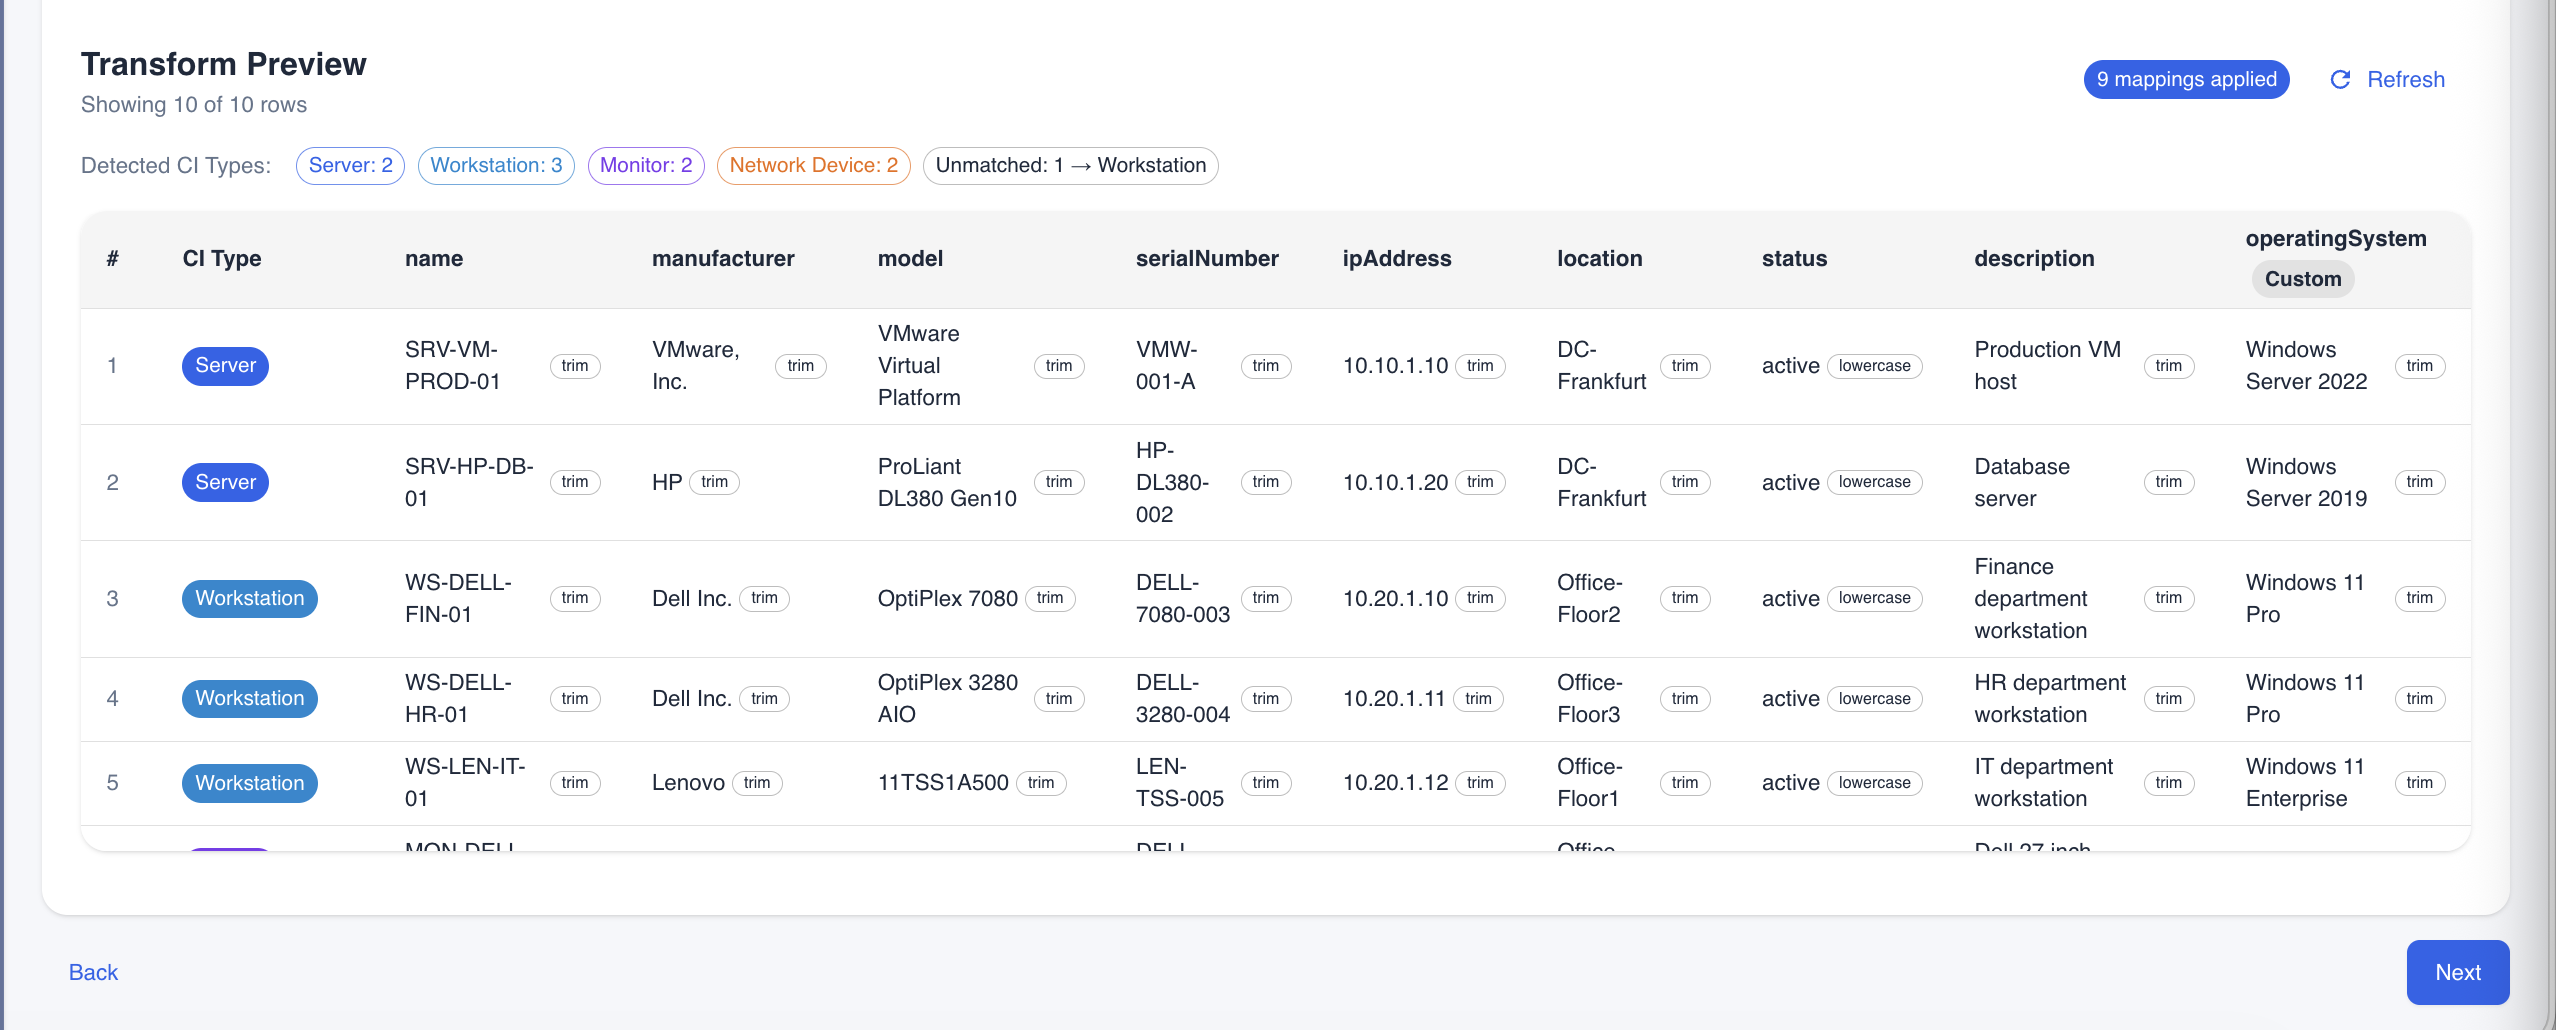 The Transform Preview shows your actual data with mappings applied. The CI Type column (colored chips) shows the device type that was automatically detected for each row: Server (red), Workstation (blue), Monitor (purple), Network Device (green). Unmatched rows fall back to the default CI type.
The Detected CI Types summary bar at the top shows a breakdown of how many rows were classified as each device type.
When you are satisfied with the mappings, click Next.
Step 5 — Approve
Review a summary of your import before execution:
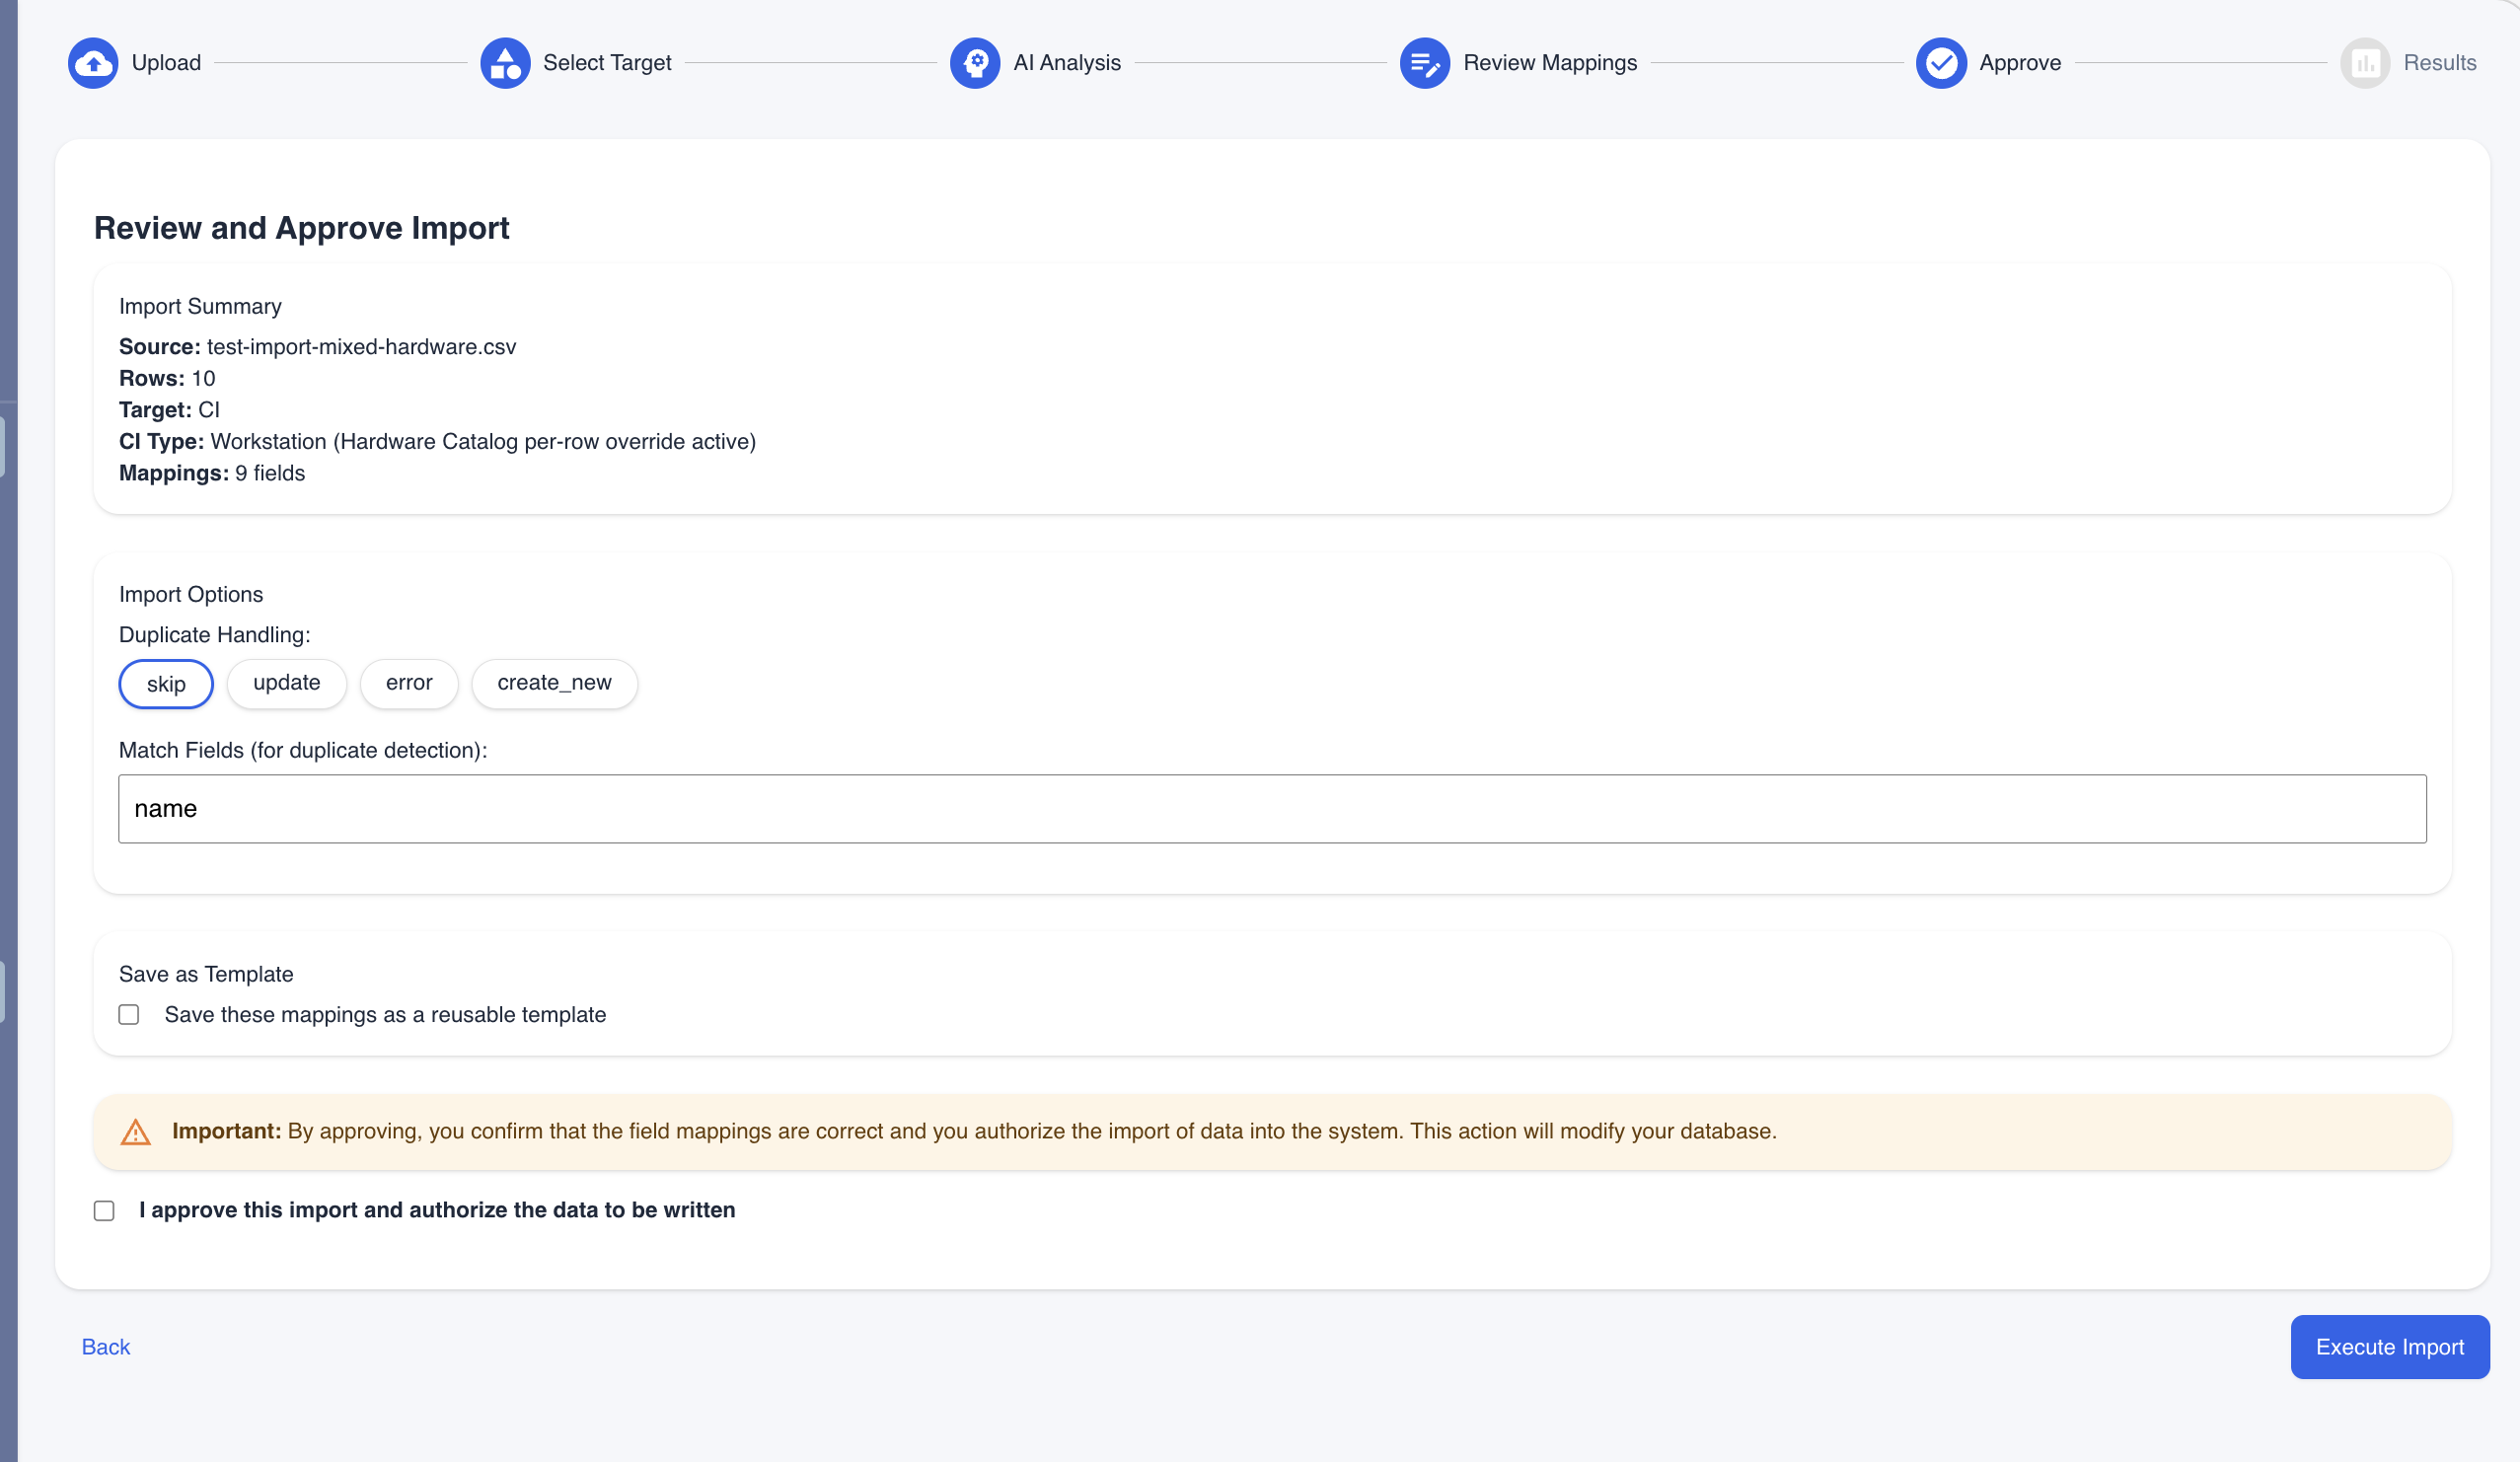 The approval screen shows the import summary, duplicate handling options, and a confirmation checkbox.
On this screen you can configure:
- Duplicate Handling — What to do when a record already exists in the CMDB:
- Skip — Leave existing records unchanged
- Update — Overwrite existing records with new data
- Error — Flag duplicates as errors
- Create new — Always create new records regardless of duplicates
- Match Fields — Which field(s) to use for duplicate detection (default: name)
- Save as Template — Save your field mappings for future imports with similar files
Check the "I approve this import" checkbox and click Execute Import.
Step 6 — Results
The system processes your data and shows real-time progress. When complete, you will see a summary of:
- Records created
- Records updated
- Records skipped (duplicates)
- Records failed (with error details)
Option 2: Describe in Natural Language
Use this method when you don't have a spreadsheet — for example, when you receive a delivery of new hardware and want to quickly register the assets by typing a description.
Step-by-step walkthrough
Step 1 — Describe your devices
Instead of uploading a file, type a description of the assets you want to import in the text field below the upload area. Be as specific as you can — include quantities, manufacturer, model, serial numbers, locations, and any other relevant details.
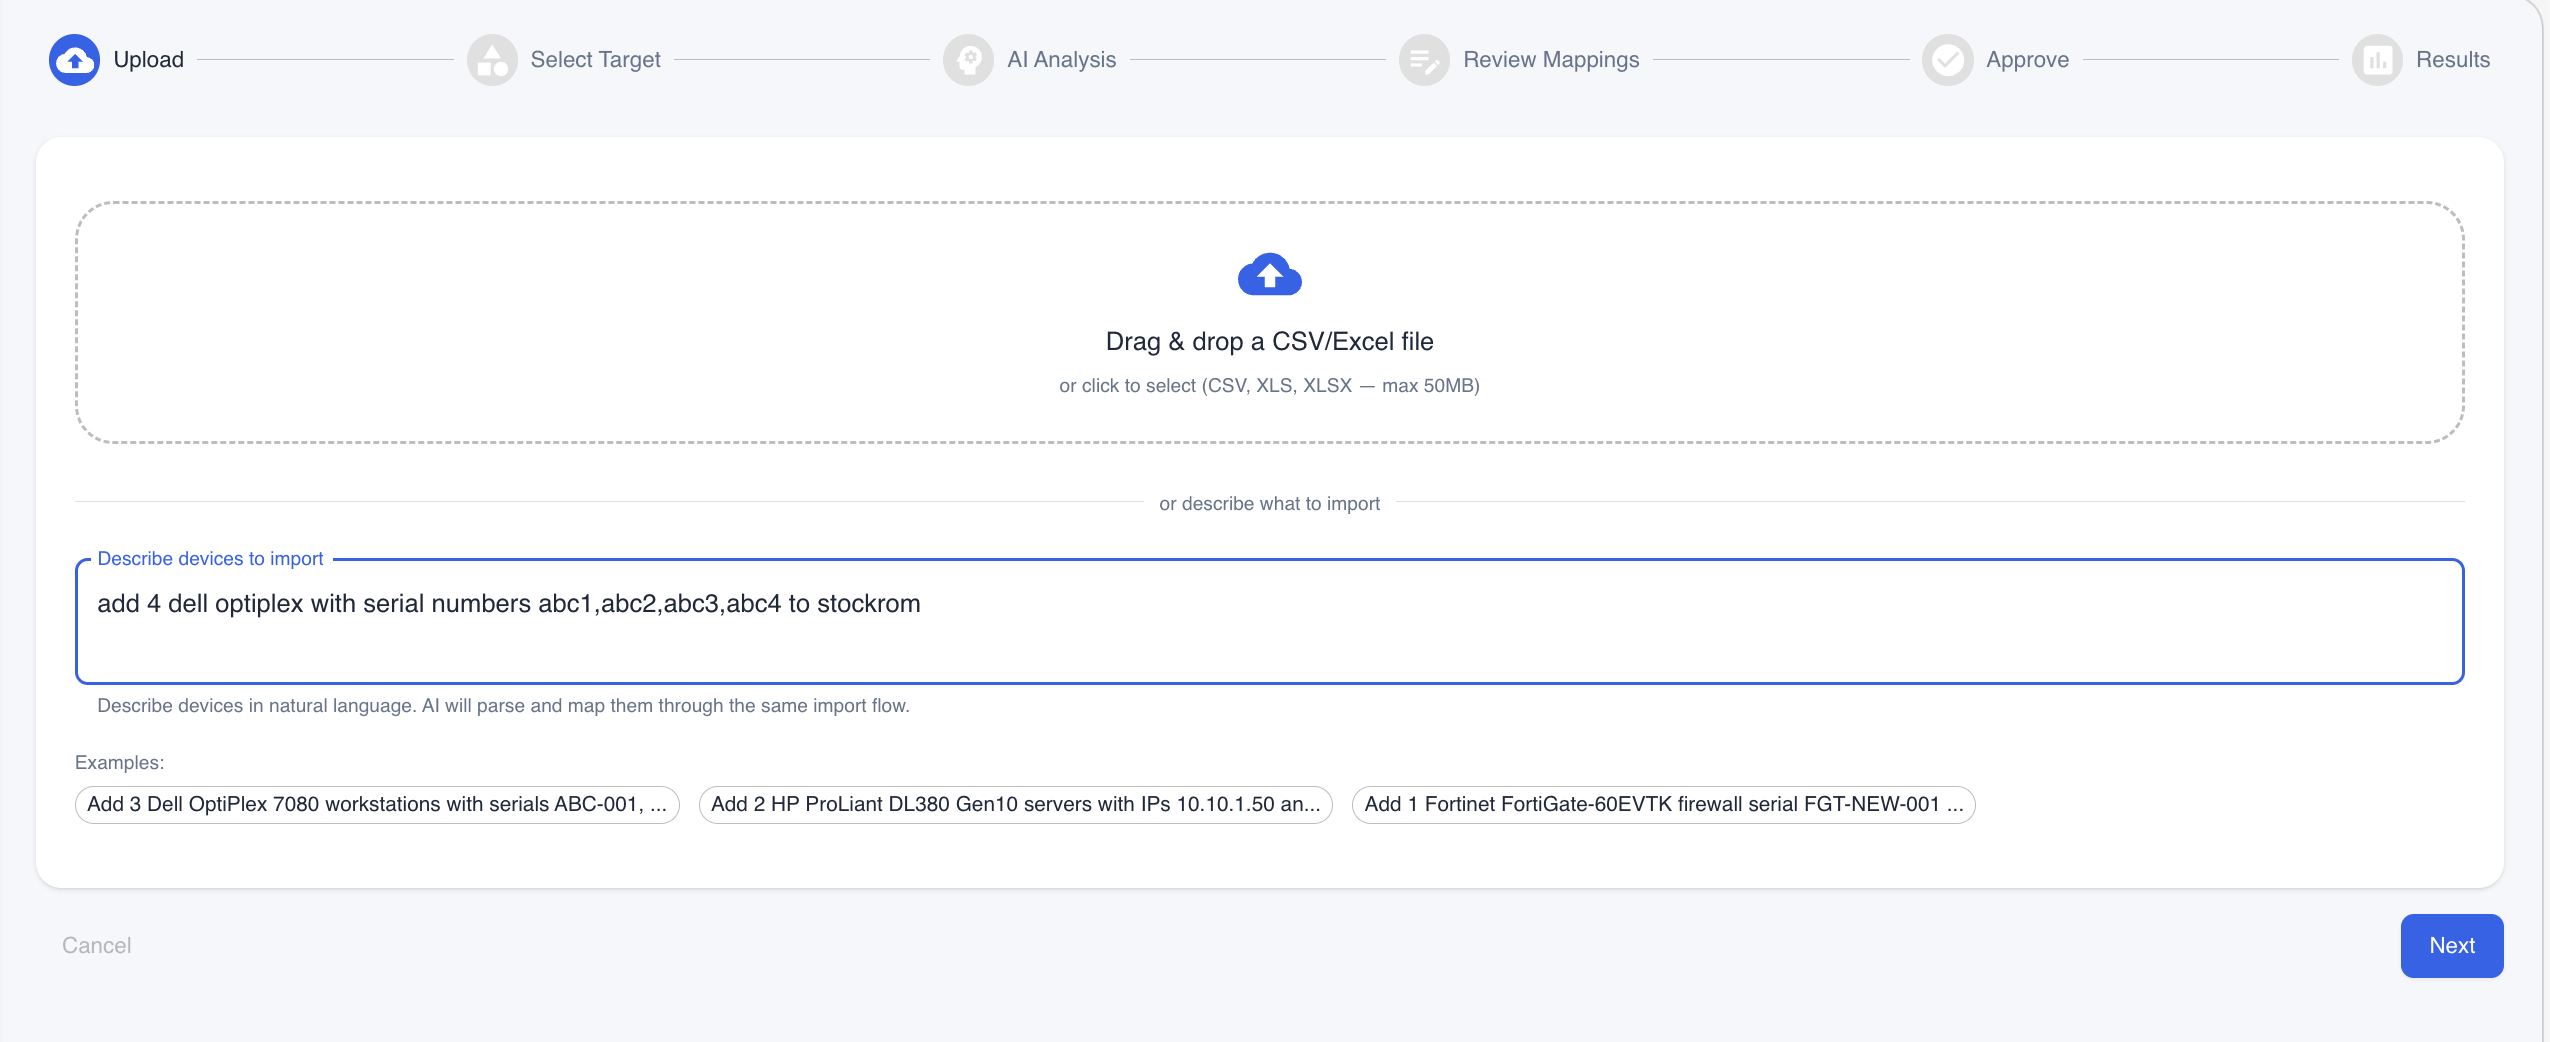 Type a natural language description such as "add 4 dell optiplex with serial numbers abc1, abc2, abc3, abc4 to stockroom". You can also click one of the example prompts for inspiration.
Example descriptions that work well:
- "Add 3 Dell OptiPlex 7080 workstations with serials ABC-001, ABC-002, ABC-003 in Office-Floor2"
- "Add 2 HP ProLiant DL380 Gen10 servers with IPs 10.10.1.50 and 10.10.1.51 in DC-Frankfurt"
- "Add 1 Fortinet FortiGate-60EVTK firewall serial FGT-NEW-001 in DC-Frankfurt"
Click Next to proceed.
Steps 2–3 — Target selection and AI analysis
These steps work exactly the same as with file import. The AI parses your description into structured rows, then analyzes and suggests mappings — just as if you had uploaded a spreadsheet.
Step 4 — Review Mappings
The parsed data appears in the same mapping editor and Transform Preview table. You can review, adjust, and verify the data before importing.
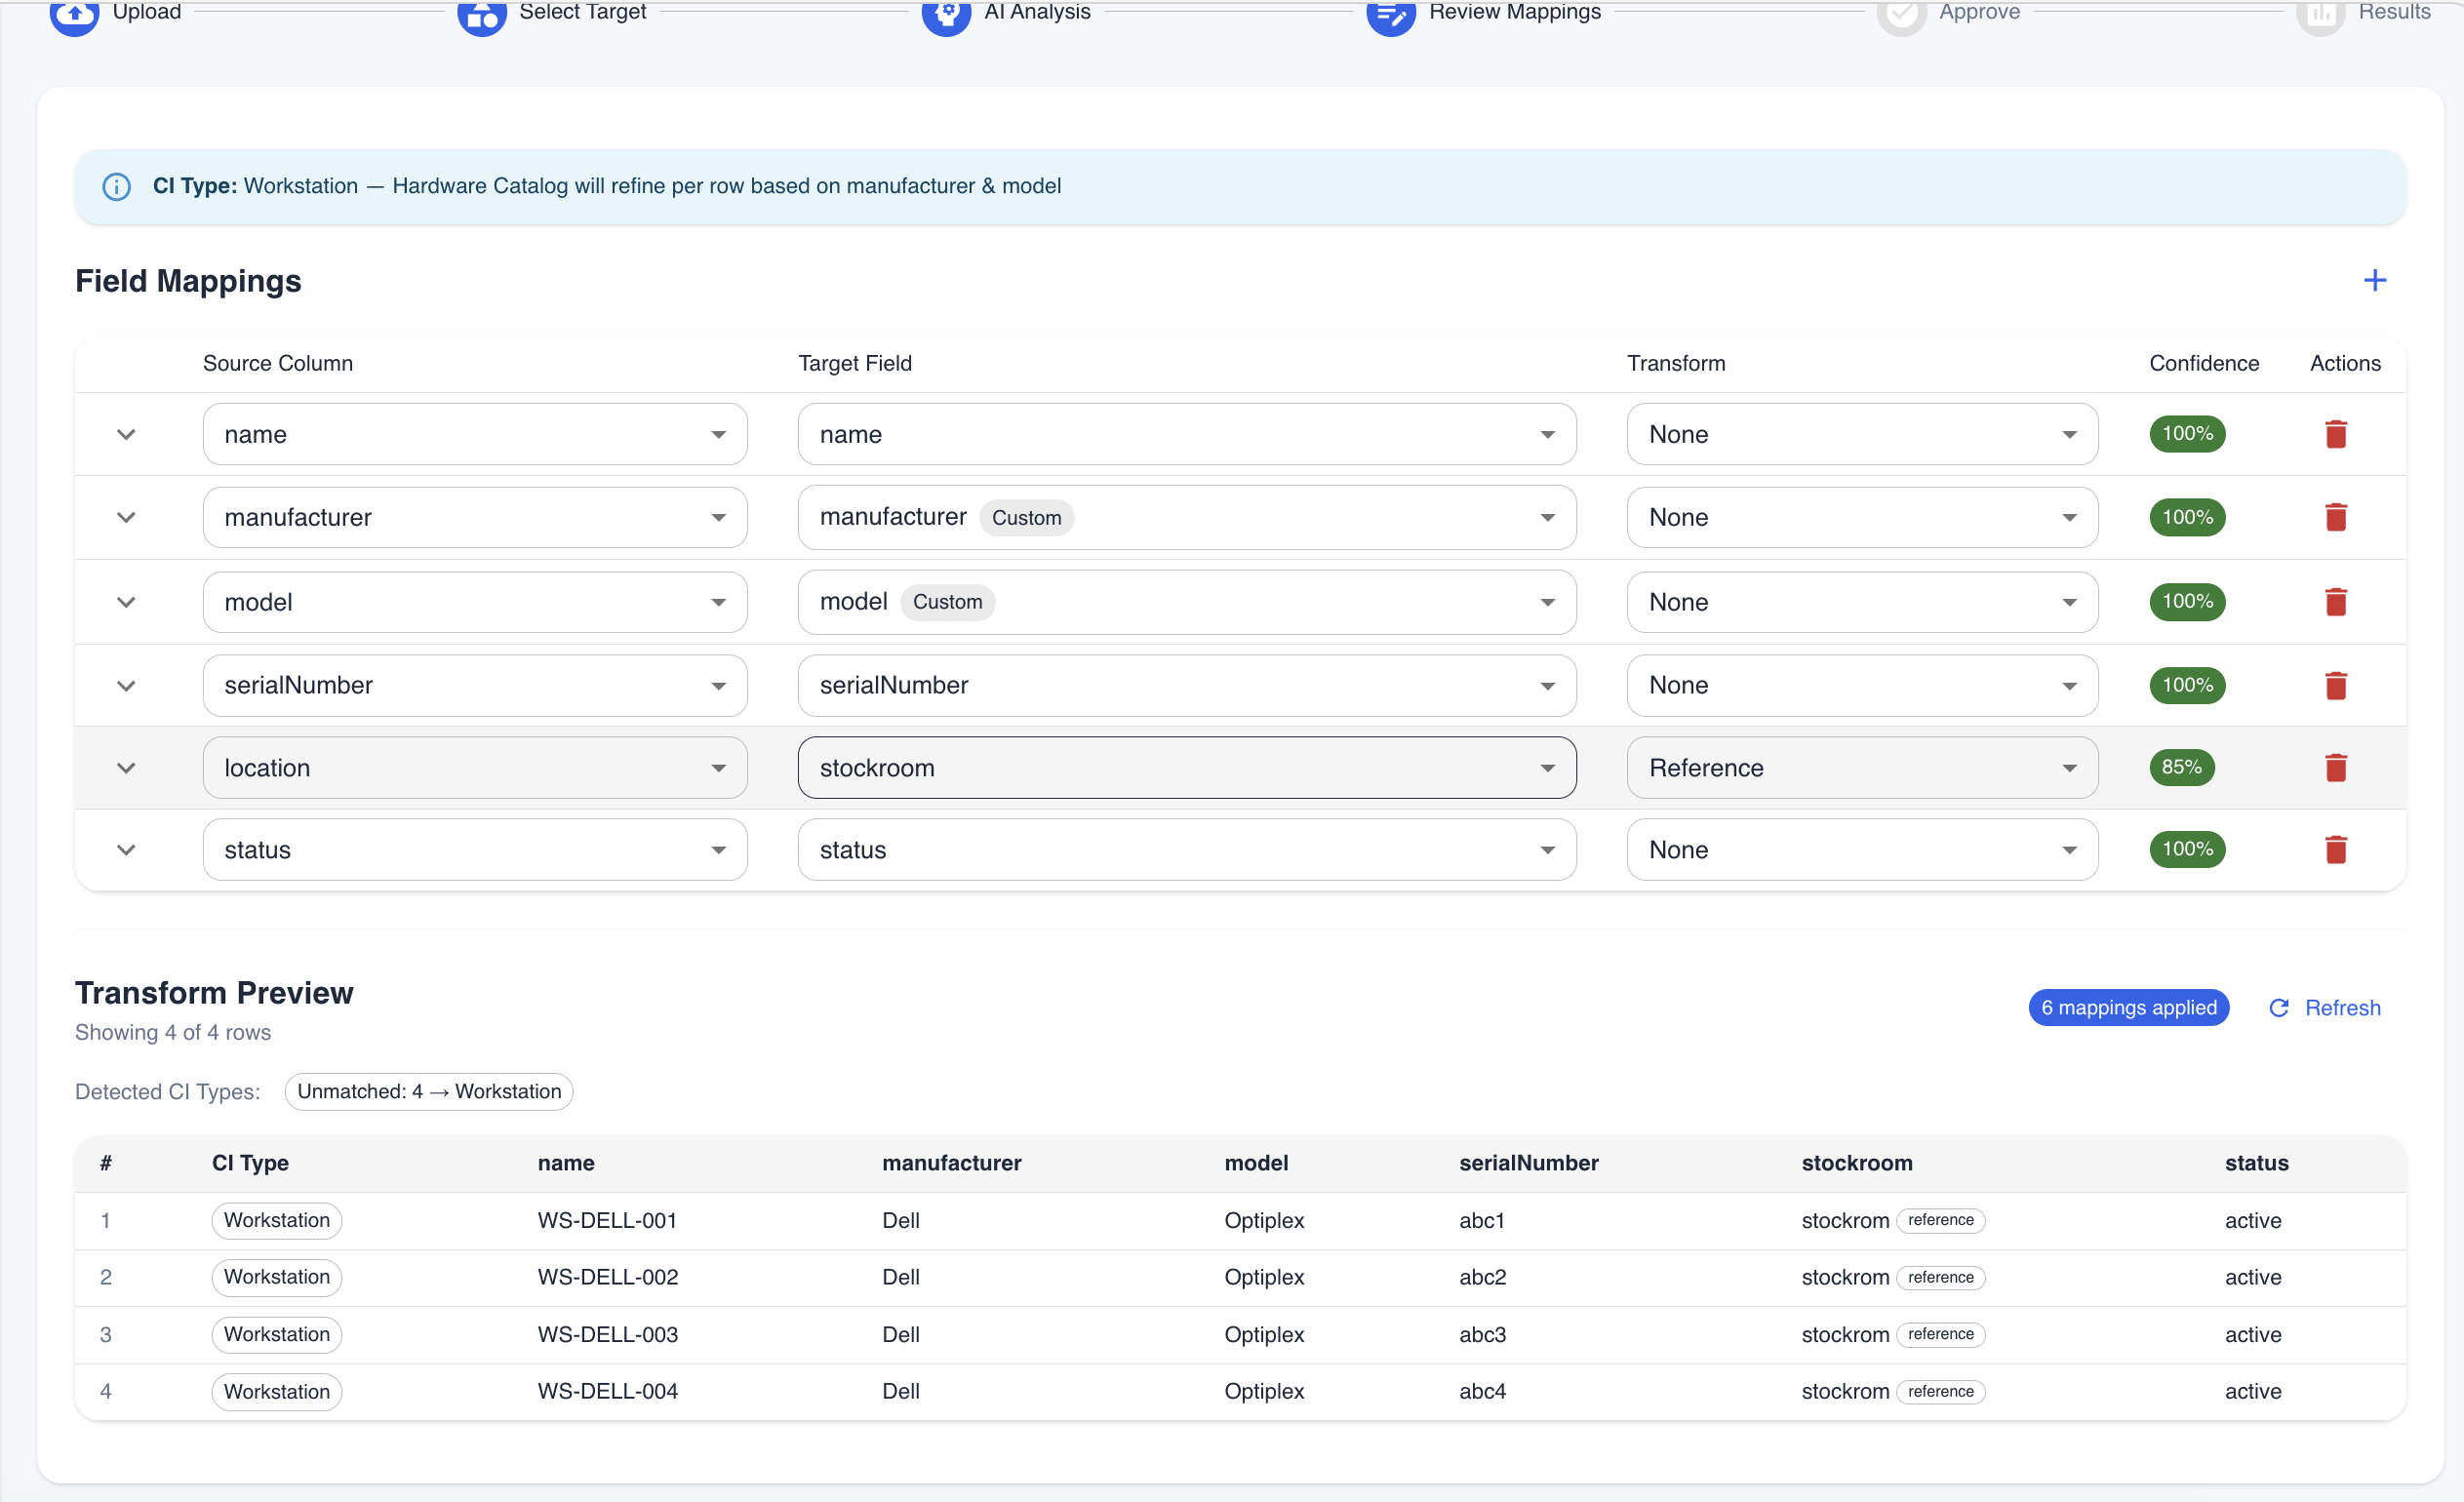 The AI has parsed the natural language description into 4 structured rows — each with name, manufacturer, model, serial number, location, and status. The mapping editor and Transform Preview work identically to the file import flow.
Steps 5–6 — Approve and Results
Approve and execute the import the same way as with file uploads.
Smart CI Type Detection
When your import data (whether from a file or a description) contains manufacturer and model information, the system automatically consults the Hardware Catalog — a database of known hardware models built from previous discovery scans.
This means:
- A row with manufacturer "Dell Inc." and model "OptiPlex 7080" is automatically classified as a Workstation
- A row with "VMware" and "Virtual Platform" is classified as a Server
- A row with "Fortinet" and "FortiGate-60E" is classified as a Network Device
- Rows that don't match any known model use the CI Type you selected (or the AI's best guess)
This detection happens automatically — you do not need to enable it or configure anything. The colored CI Type chips in the Transform Preview (Step 4) show you exactly how each row was classified before you approve the import.
Saving and Reusing Templates
If you import data from the same source regularly (e.g., a weekly vendor report), you can save your field mappings as a template:
- In the Approve step, check "Save these mappings as a reusable template"
- Enter a descriptive name (e.g., "Dell Weekly Inventory Report")
- Complete the import
The next time you upload a file with the same column structure, the system will automatically suggest your saved template in the Upload step — letting you skip the mapping review entirely.
Tips for Best Results
- Column headers matter: Name your spreadsheet columns clearly (e.g., "Hostname", "IP Address", "Manufacturer"). The AI uses column names as its primary signal for mapping
- Be specific in descriptions: Instead of "add some servers", write "add 3 HP ProLiant DL380 Gen10 servers with serial numbers SRV-001, SRV-002, SRV-003 in DC-Frankfurt"
- Include manufacturer and model: This enables automatic device type detection from the Hardware Catalog
- Use the description field with file uploads: Even when uploading a CSV, adding a brief description (e.g., "network switch inventory from Cisco") helps the AI make better mapping decisions
- Review the Transform Preview: Always scroll down to check the preview table before approving — this shows exactly how your data will be imported
- Save templates for recurring imports: If you receive the same report format regularly, save a template to streamline future imports
Frequently Asked Questions
Q: What file formats are supported? A: CSV, XLS, and XLSX files up to 50 MB.
Q: Do I need to format my spreadsheet in a specific way? A: No. The AI adapts to your column naming and layout. However, having clear column headers (e.g., "Hostname" instead of "Col1") produces better results.
Q: What happens if the AI maps a column incorrectly? A: You can change any mapping in the Review Mappings step using the dropdown menus. The AI suggestions are a starting point — you always have final control.
Q: Can I import different device types in a single file? A: Yes. If your file contains a mix of servers, workstations, monitors, and network devices, the system automatically detects the correct type for each row based on manufacturer and model.
Q: What does "Hardware Catalog will refine per row" mean? A: It means the system will look up each row's manufacturer and model in the built-in Hardware Catalog (populated by discovery scans) to determine the exact device type. This overrides any single CI type you may have selected.
Q: Can I undo an import? A: Imported records are created in your CMDB like any other record. You can delete them individually or in bulk from the CI List if needed.
Q: What is the "Confidence" percentage in the mapping editor? A: It indicates how confident the AI is that a particular source column should map to the suggested target field. Green (high confidence) means the AI is very sure; lower values suggest you should double-check the mapping.